Playbook: Running Dynamic Meta Ads Using Swym Wishlist Plus Events
Overview
Shoppers who add products to their wishlist are some of your highest-intent visitors — they've told you exactly what they want. This playbook walks you through how to use Swym Wishlist Plus to capture those signals and run Dynamic Product Ads (DPA) on Meta to bring those shoppers back and convert them.
What you'll achieve:
Retarget high-intent wishlist shoppers with the exact products they saved
Exclude recent purchasers to avoid wasted spend
Scale with Lookalike Audiences to acquire new customers
Step 1: Connect Swym Wishlist Plus to Meta Ads
This integration is server-side, meaning events are sent directly from Swym's servers to Meta — bypassing ad blockers, cookie restrictions, and browser-side tracking limitations. This gives you more reliable and complete data than a pixel-only setup.
1.1 Open the Integrations Tab
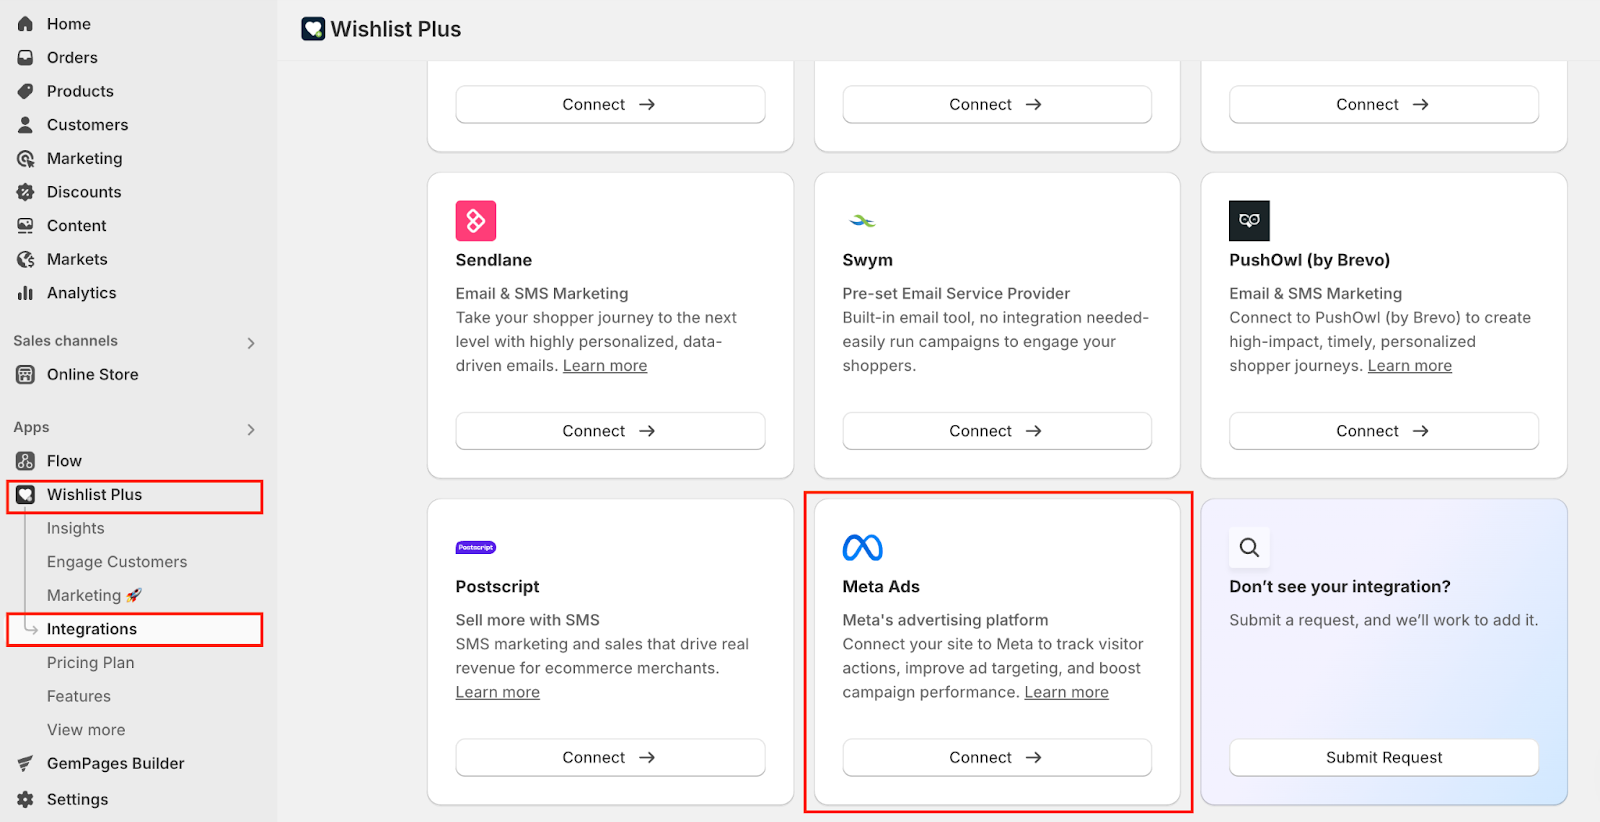
In your Shopify Admin, go to Apps → Wishlist Plus. Click on the "Integrations" tab in the top navigation.
1.2 Connect to Meta Ads
Find the Meta Ads tile and click "Connect."
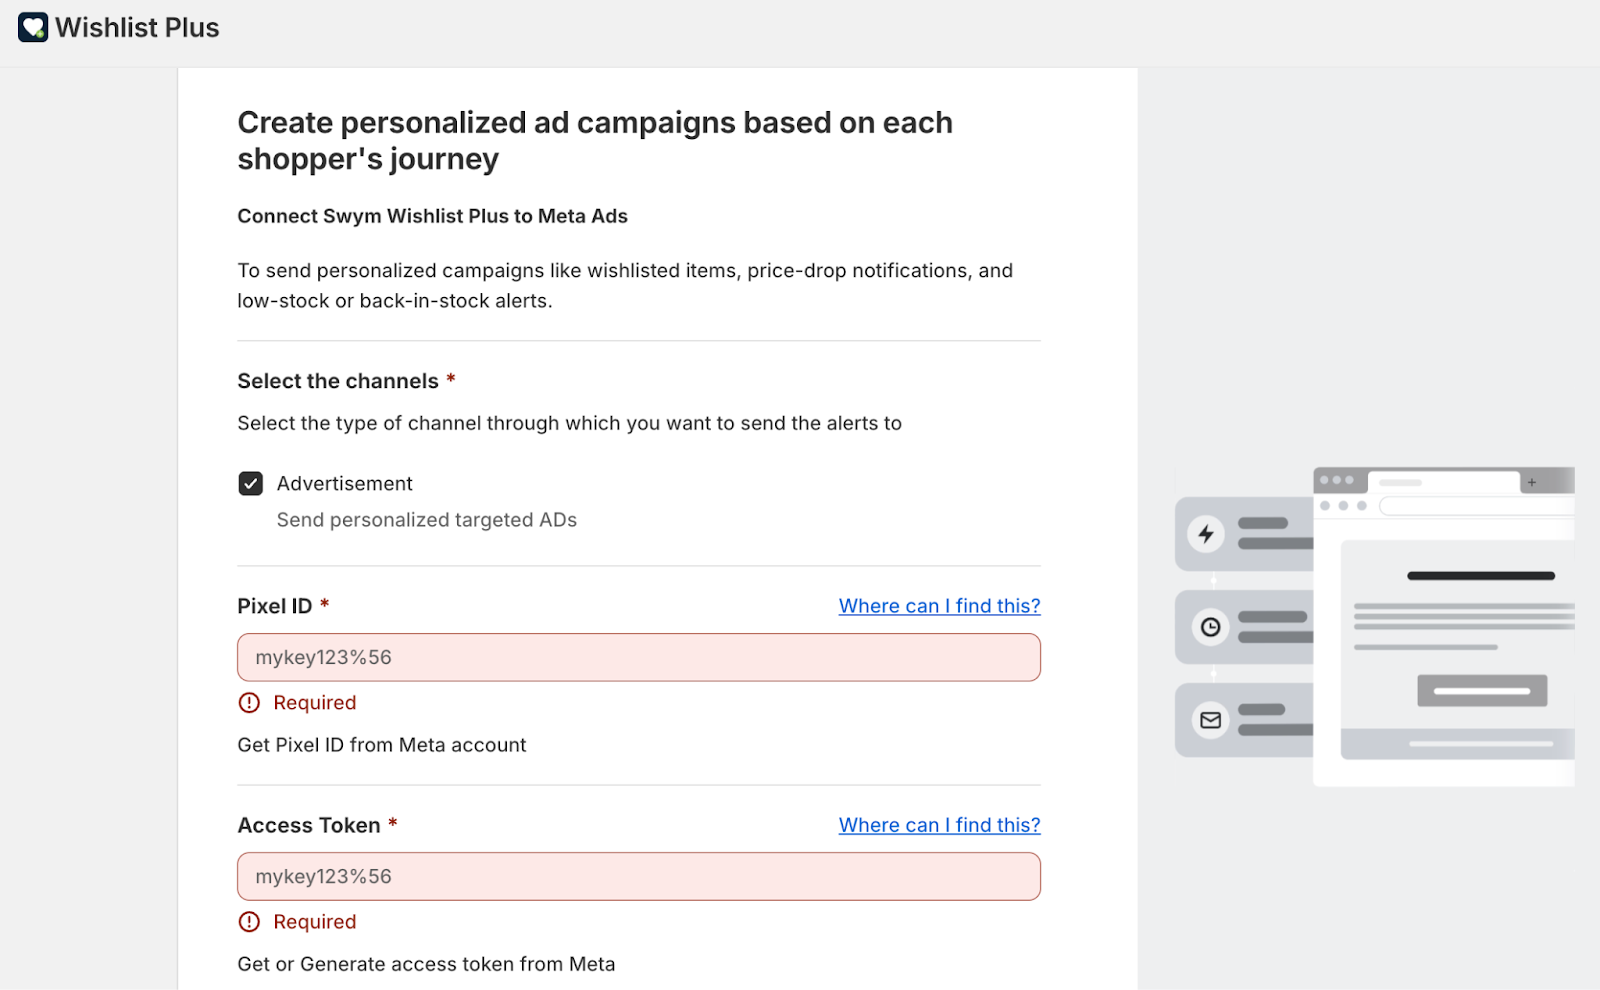
1.3 Enter Your Meta Pixel ID and Access Token
You'll be redirected to a configuration page. Enter:
Meta Pixel ID — Find this in your Meta Events Manager under your Pixel settings.
Access Token — Generate a System User Access Token from your Meta Business Manager. This is required for the server-side Conversions API to work.
Click Save once both fields are filled in.
💡 Tip: Use a System User token rather than a personal user token. System User tokens don't expire and won't break if a team member leaves.
1.4 Send a Test Event
Before going live, verify the connection is working:
In the same Meta Ads page in Swym, scroll to "Test Events & Triggers"
Select "Item Added to Wishlist" as the event to test
Enter a test email or phone number
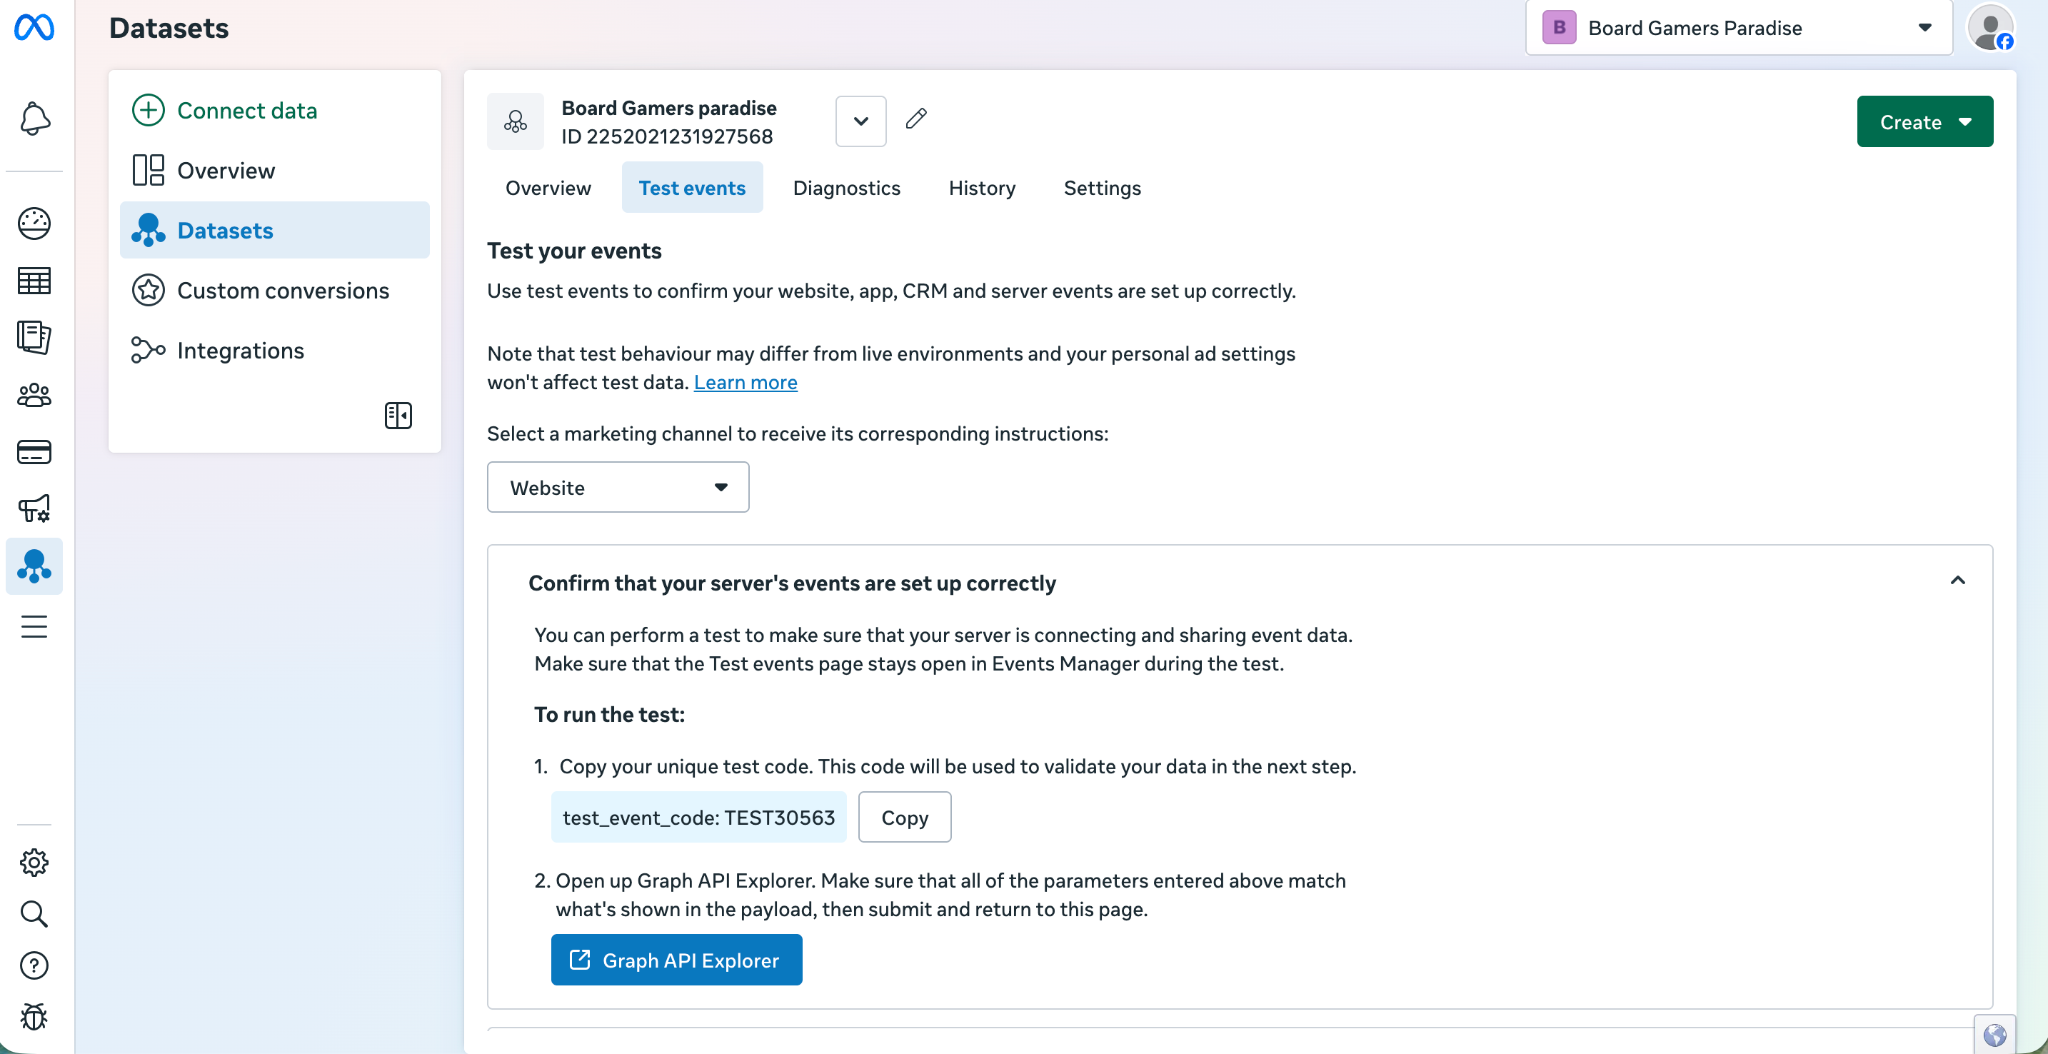
Copy the Test Event Code from Meta Events Manager (found under Test Events tab)
Paste it in and click "Send Test Triggers"
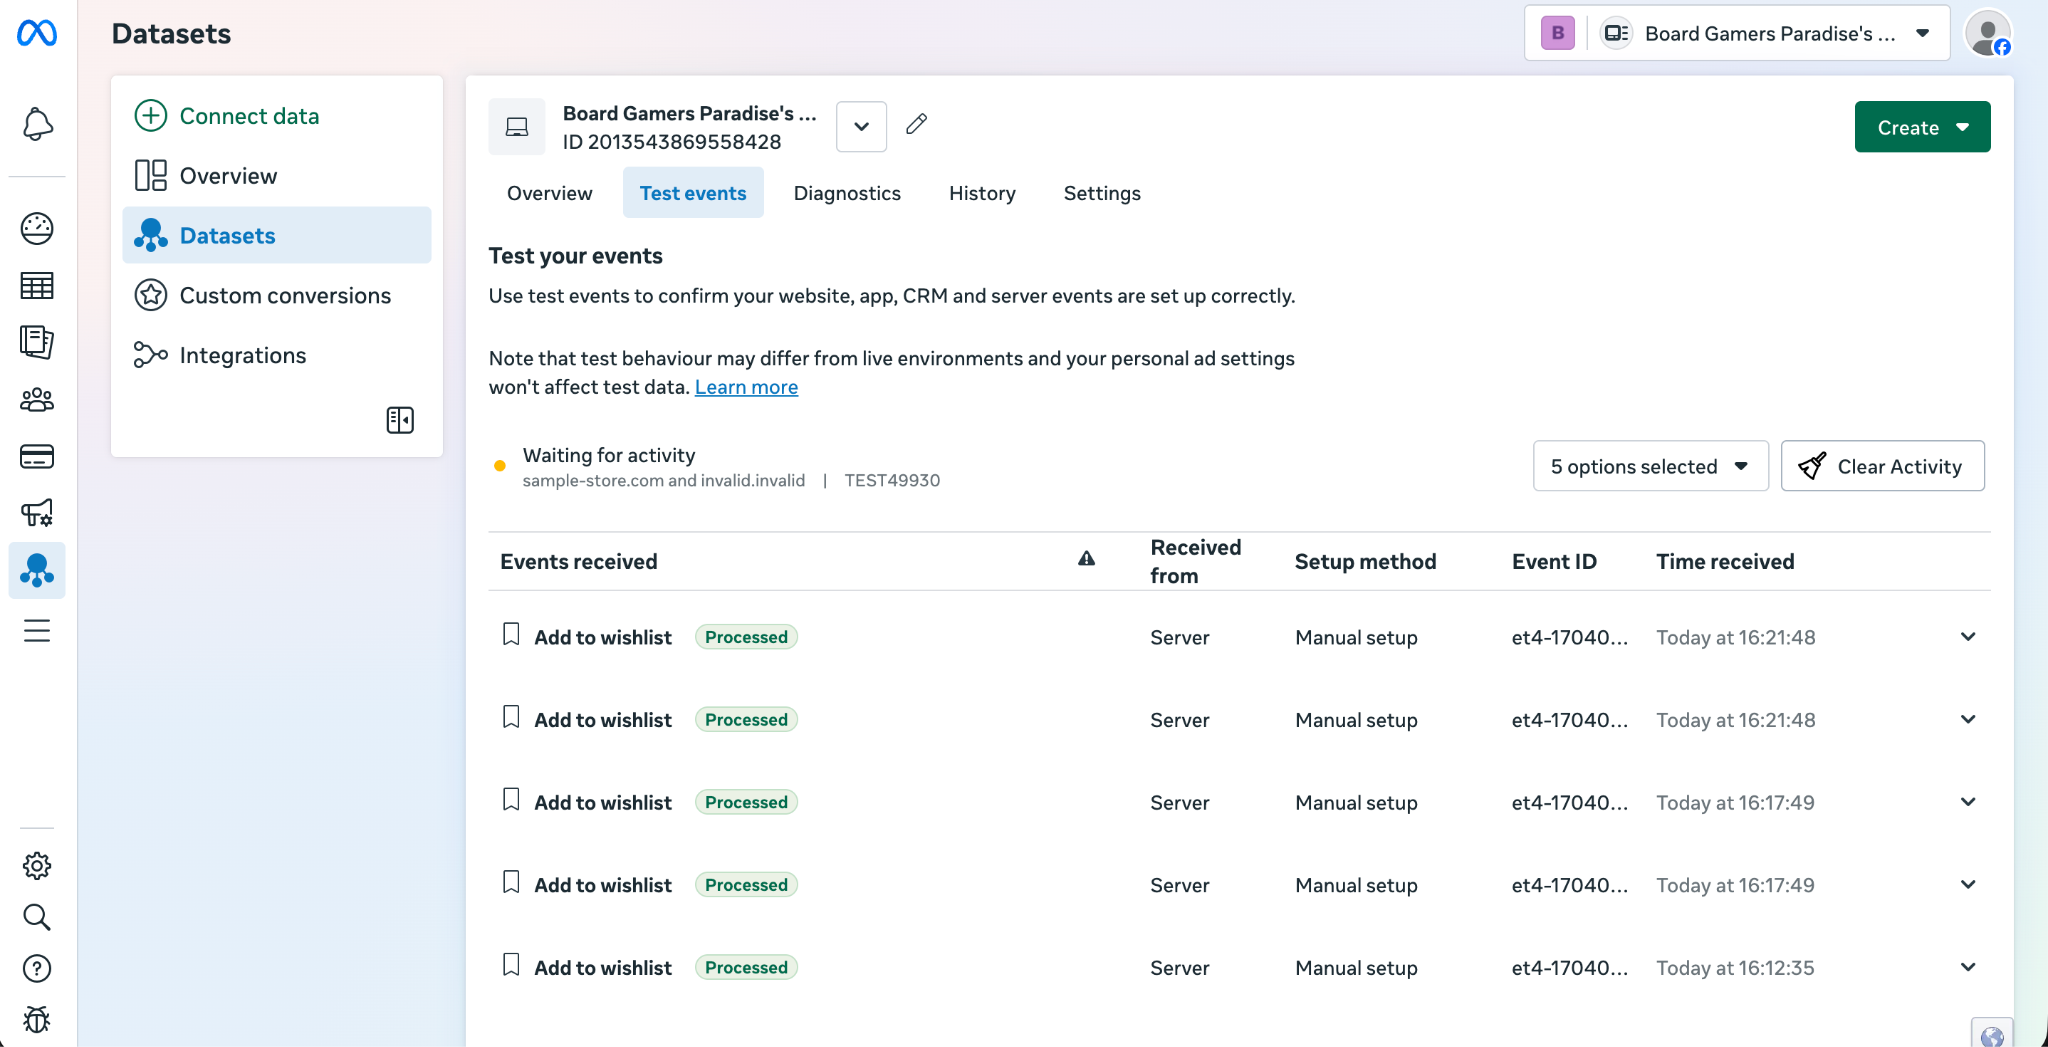
Then open Meta Events Manager → Test Events and confirm the event appears.
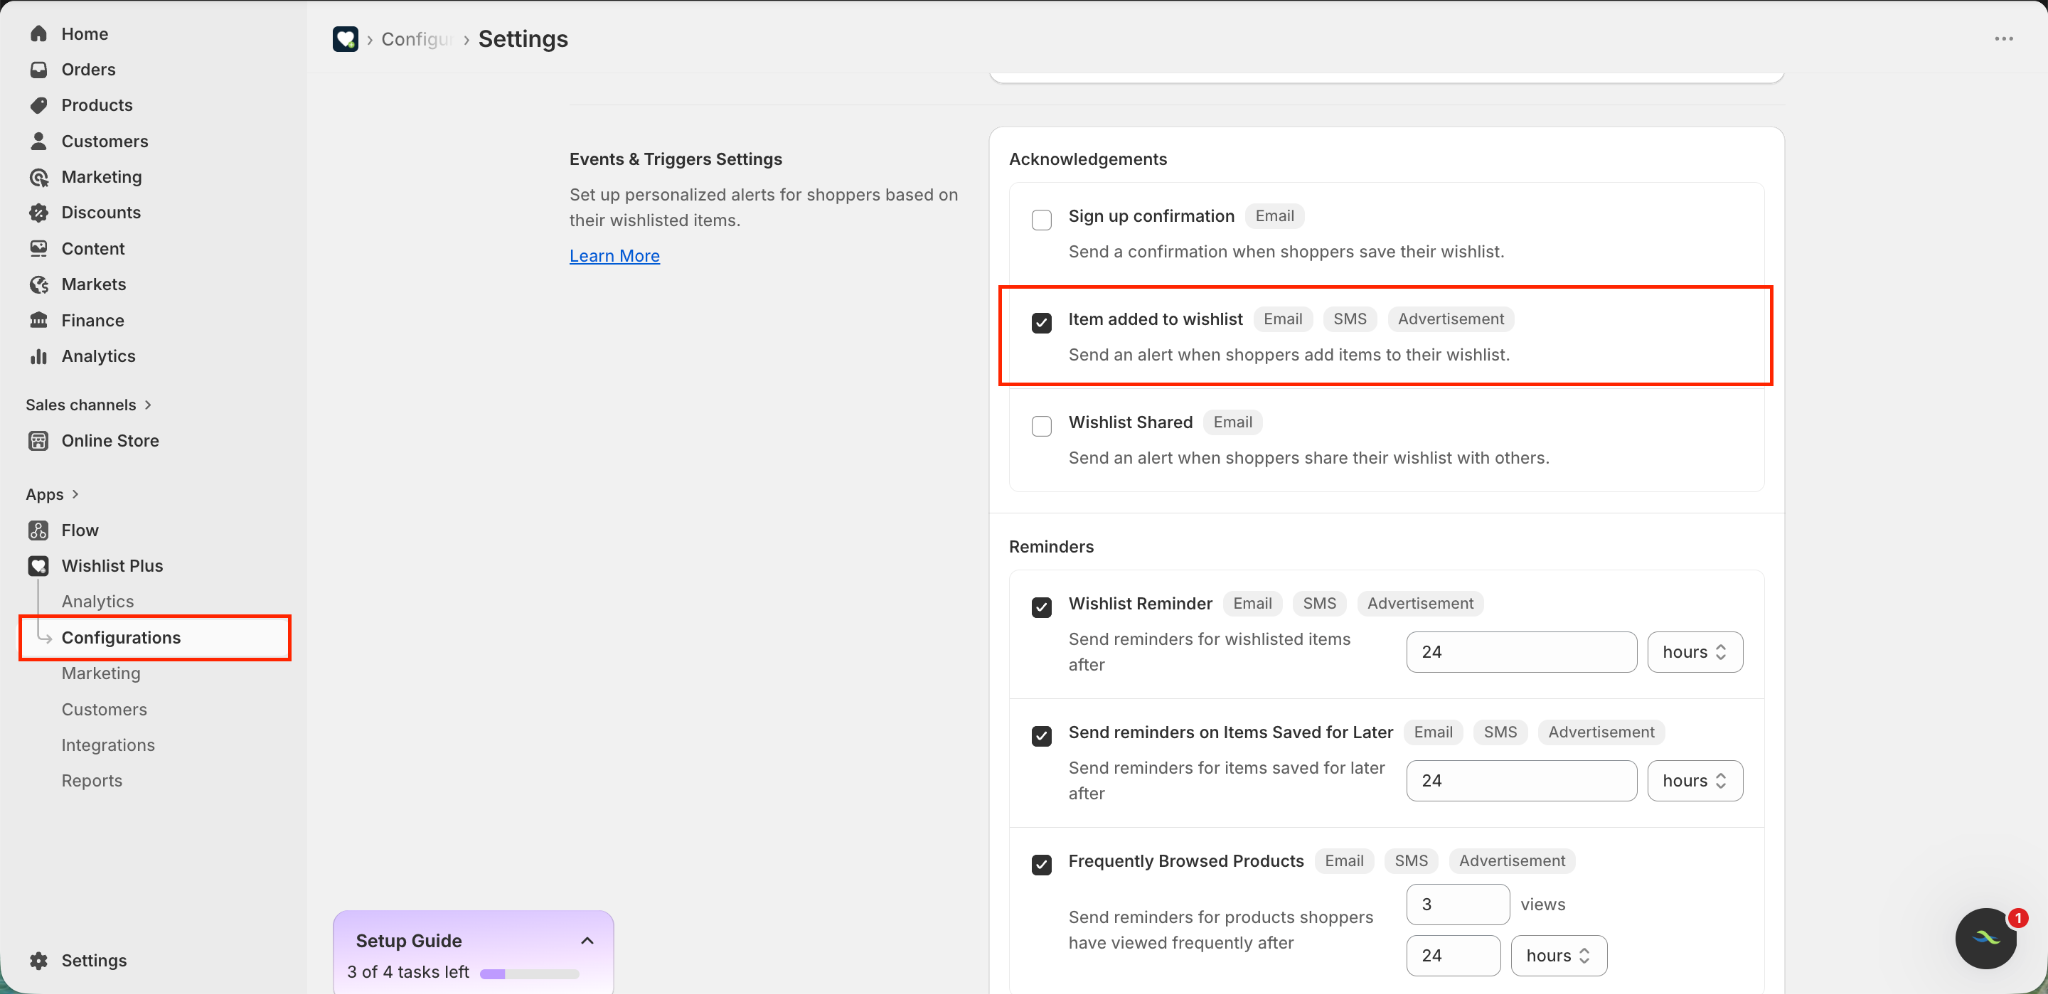
1.5 Enable the "Item Added to Wishlist" Trigger
Go to Configurations → Alerts & Trigger Settings inside Wishlist Plus. Make sure the "Item added to wishlist" toggle is turned on. This is the event that fires when a shopper adds a product to their wishlist and is the signal we'll use to build our audience.
Note on other available events: Swym also supports sending Wishlist Reminder, Price Drop, Low Stock, and Restock Alert events to Meta. These can be used for additional retargeting campaigns later, but for this playbook we're focused on Add to Wishlist.
Step 2: Sync Your Shopify Product Catalog to Meta
For Dynamic Product Ads to work, Meta needs to know your product catalog so it can serve the right product to the right shopper. The Add to Wishlist event includes the Shopify product ID — Meta uses this to match the product in your catalog and render it in the ad.
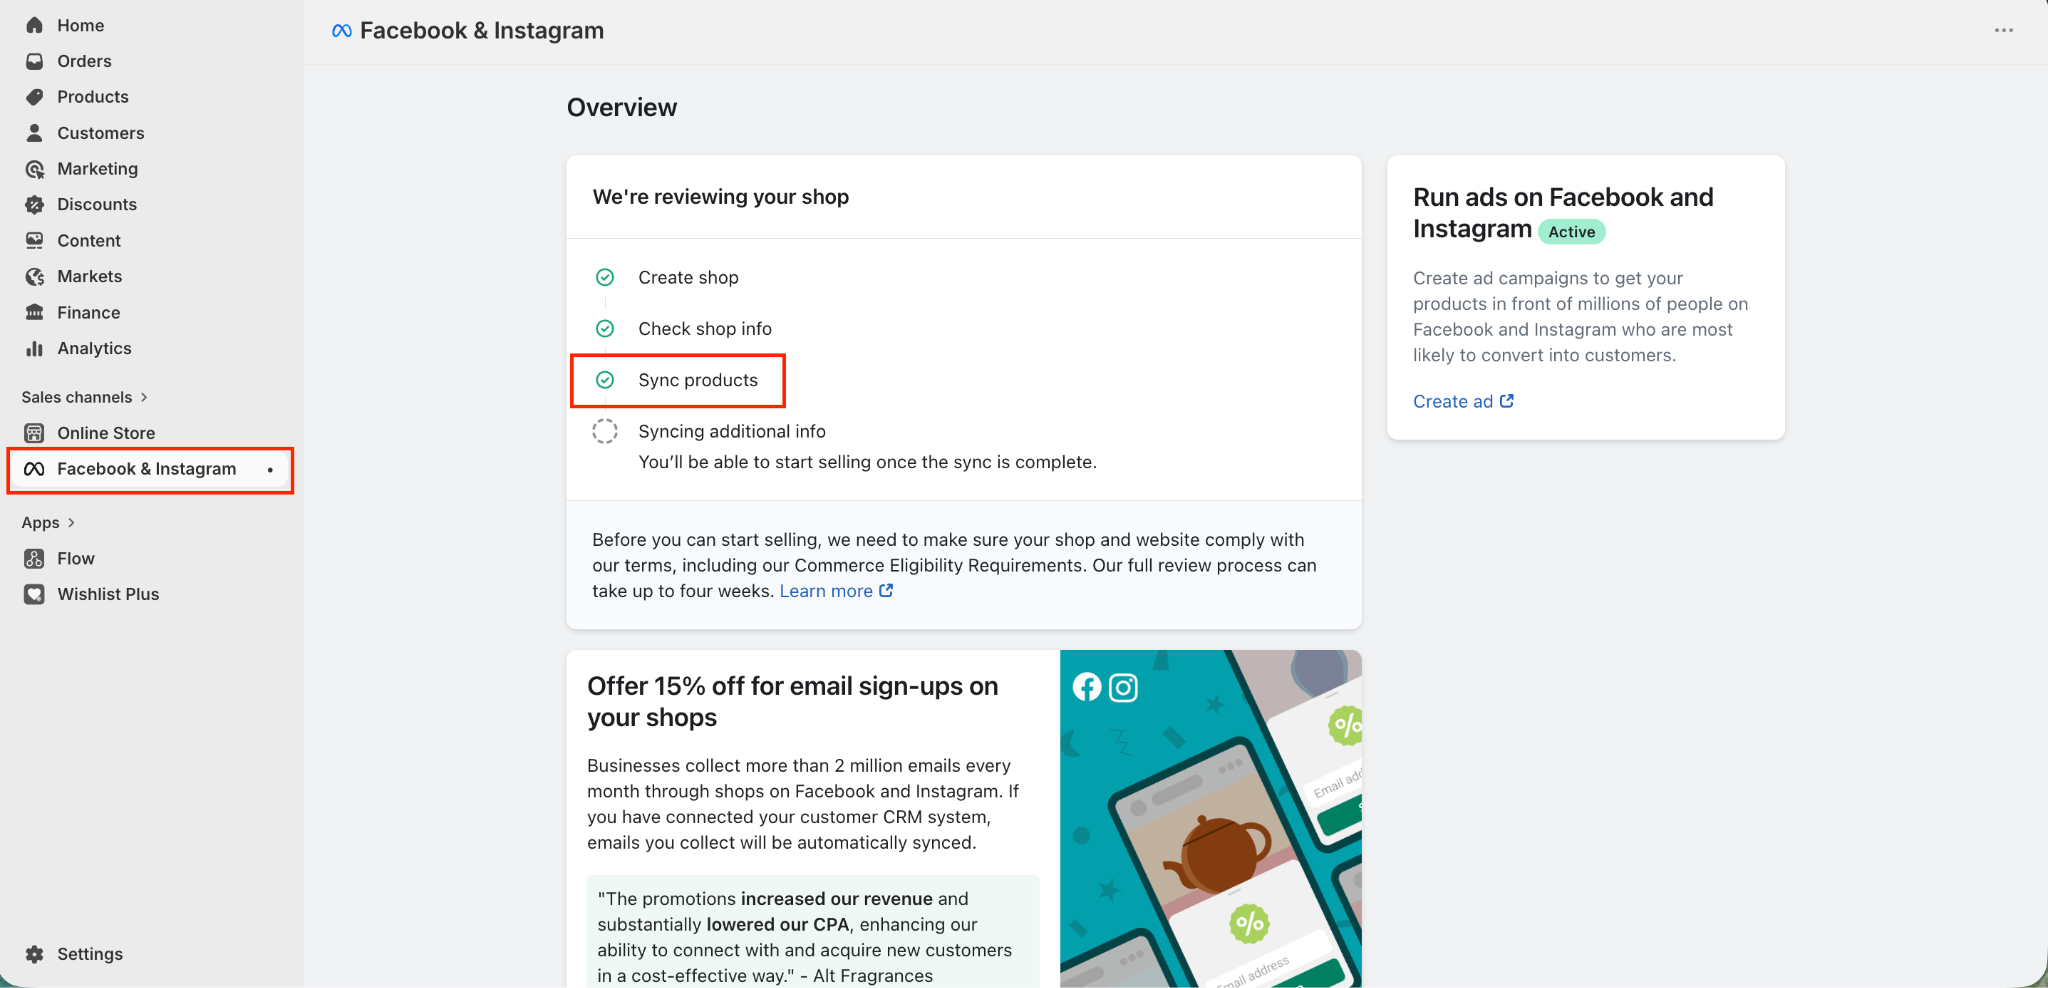
2.1 Connect Shopify to Meta via the Facebook & Instagram Channel
In Shopify Admin, go to Sales Channels and add the Facebook & Instagram channel if you haven't already. Follow the setup flow to connect your Meta Business Manager account.
2.2 Sync Your Product Catalog
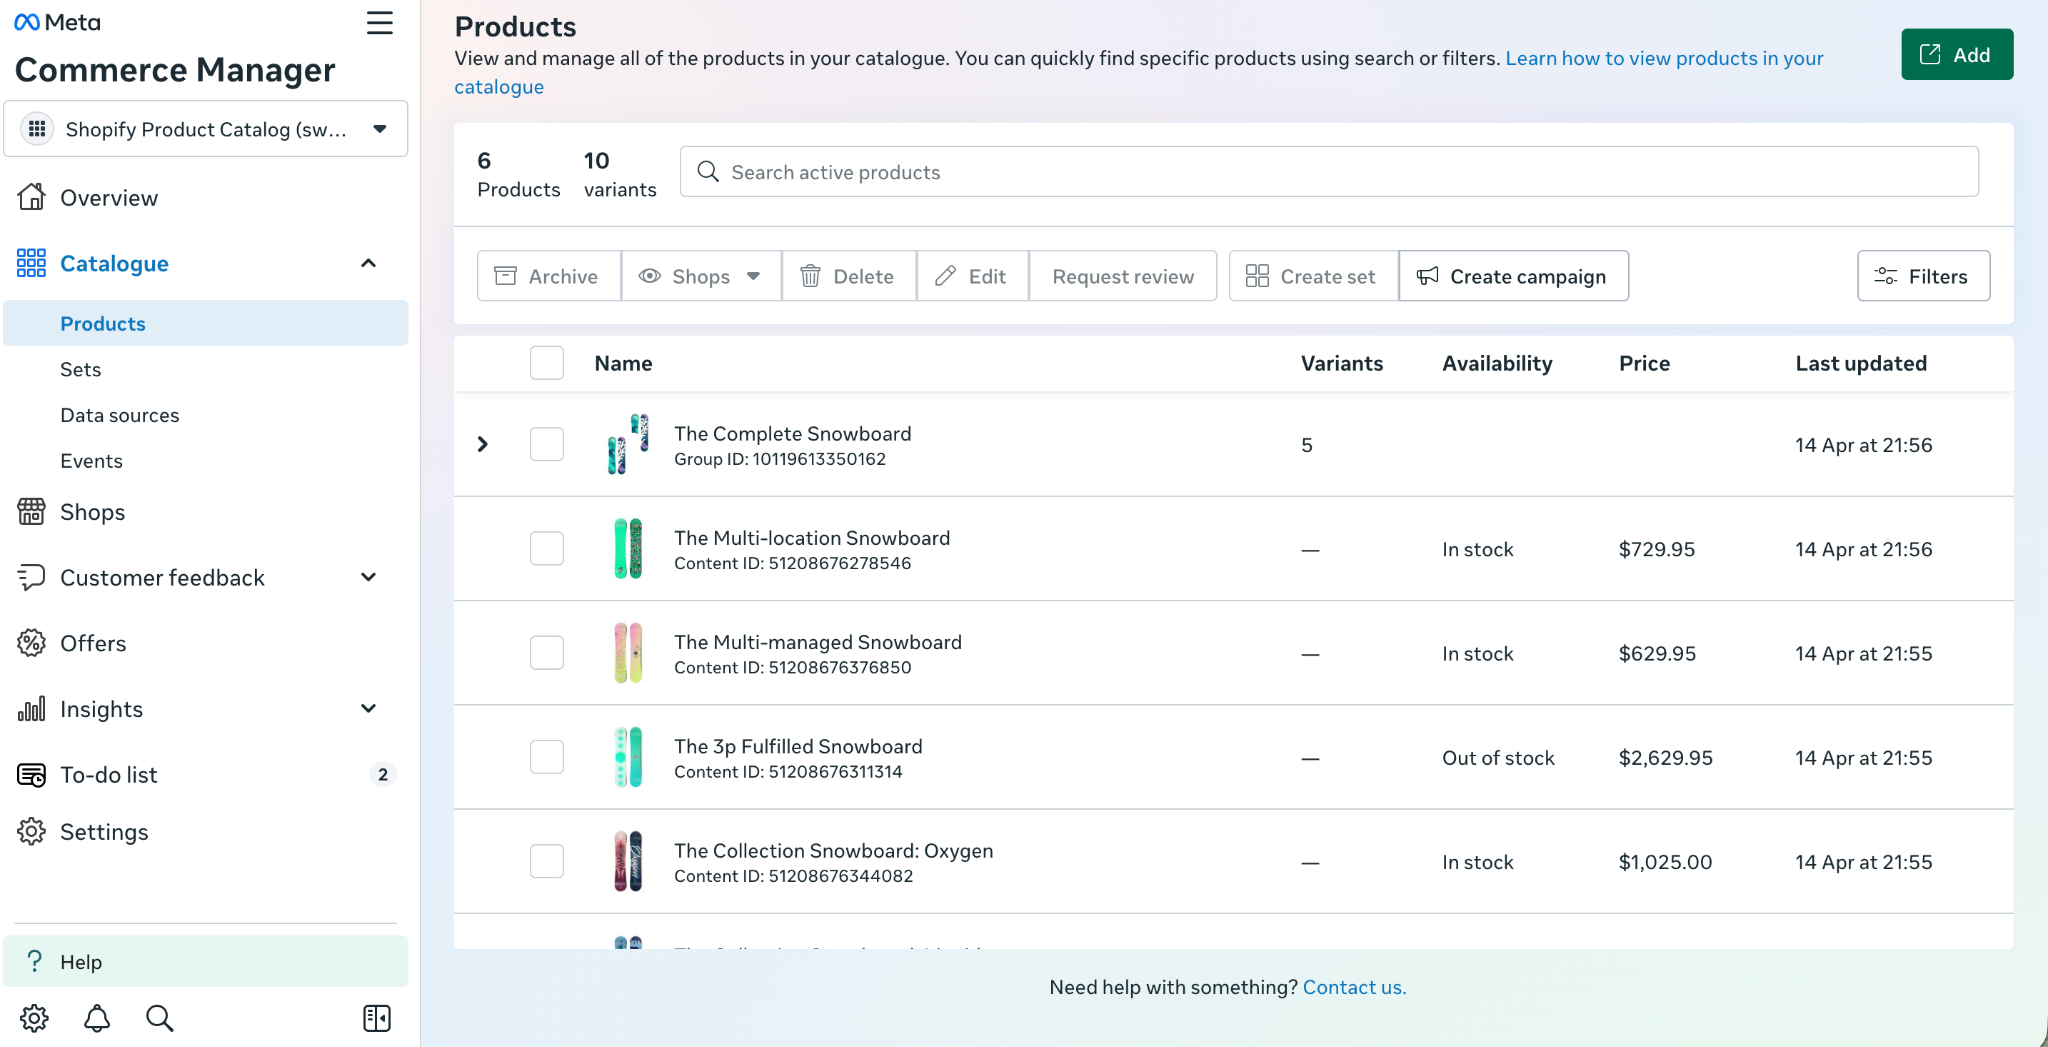
Once connected, Shopify will automatically sync your product catalog to Meta Commerce Manager. This keeps product titles, prices, images, and availability up to date in real time.
Go to Meta Commerce Manager → Catalogs to confirm your catalog has synced and products are visible.
Why this matters: The product IDs passed by Swym in the Add to Wishlist event must match the product IDs in your Meta catalog. The Shopify–Meta integration handles this automatically — no manual mapping needed.
Step 3: Build Your Custom Audience in Meta Ads Manager
Now that events are flowing into Meta, you can build a Custom Audience of shoppers who added items to their wishlist.
3.1 Create the Custom Audience
In Meta Ads Manager, go to Audiences (under the Tools menu)
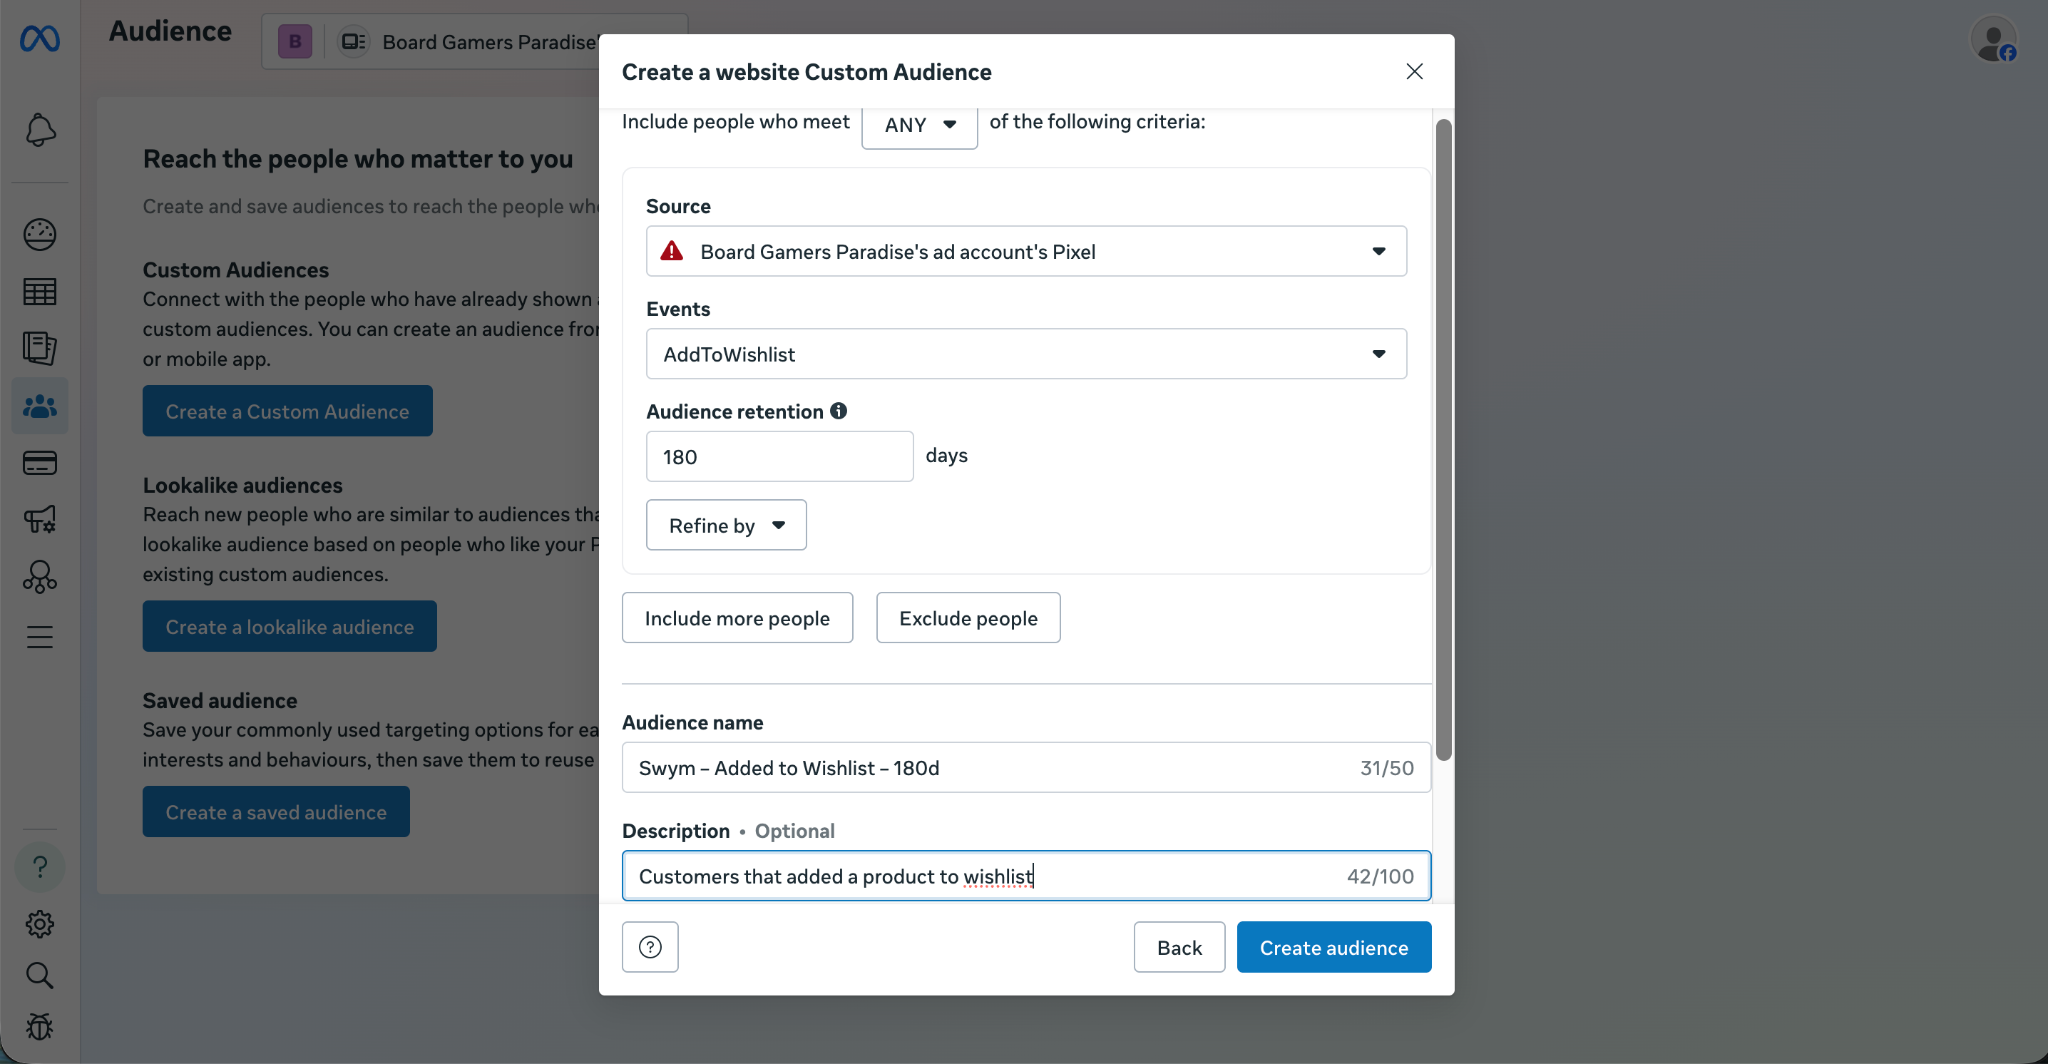
Click "Create Audience" → "Custom Audience"
Select "Website" as the source
Under events, choose "AddToWishlist" (this is Meta's Standard Event name — it maps directly to the Swym Add to Wishlist event)
Set the retention window to 180 days
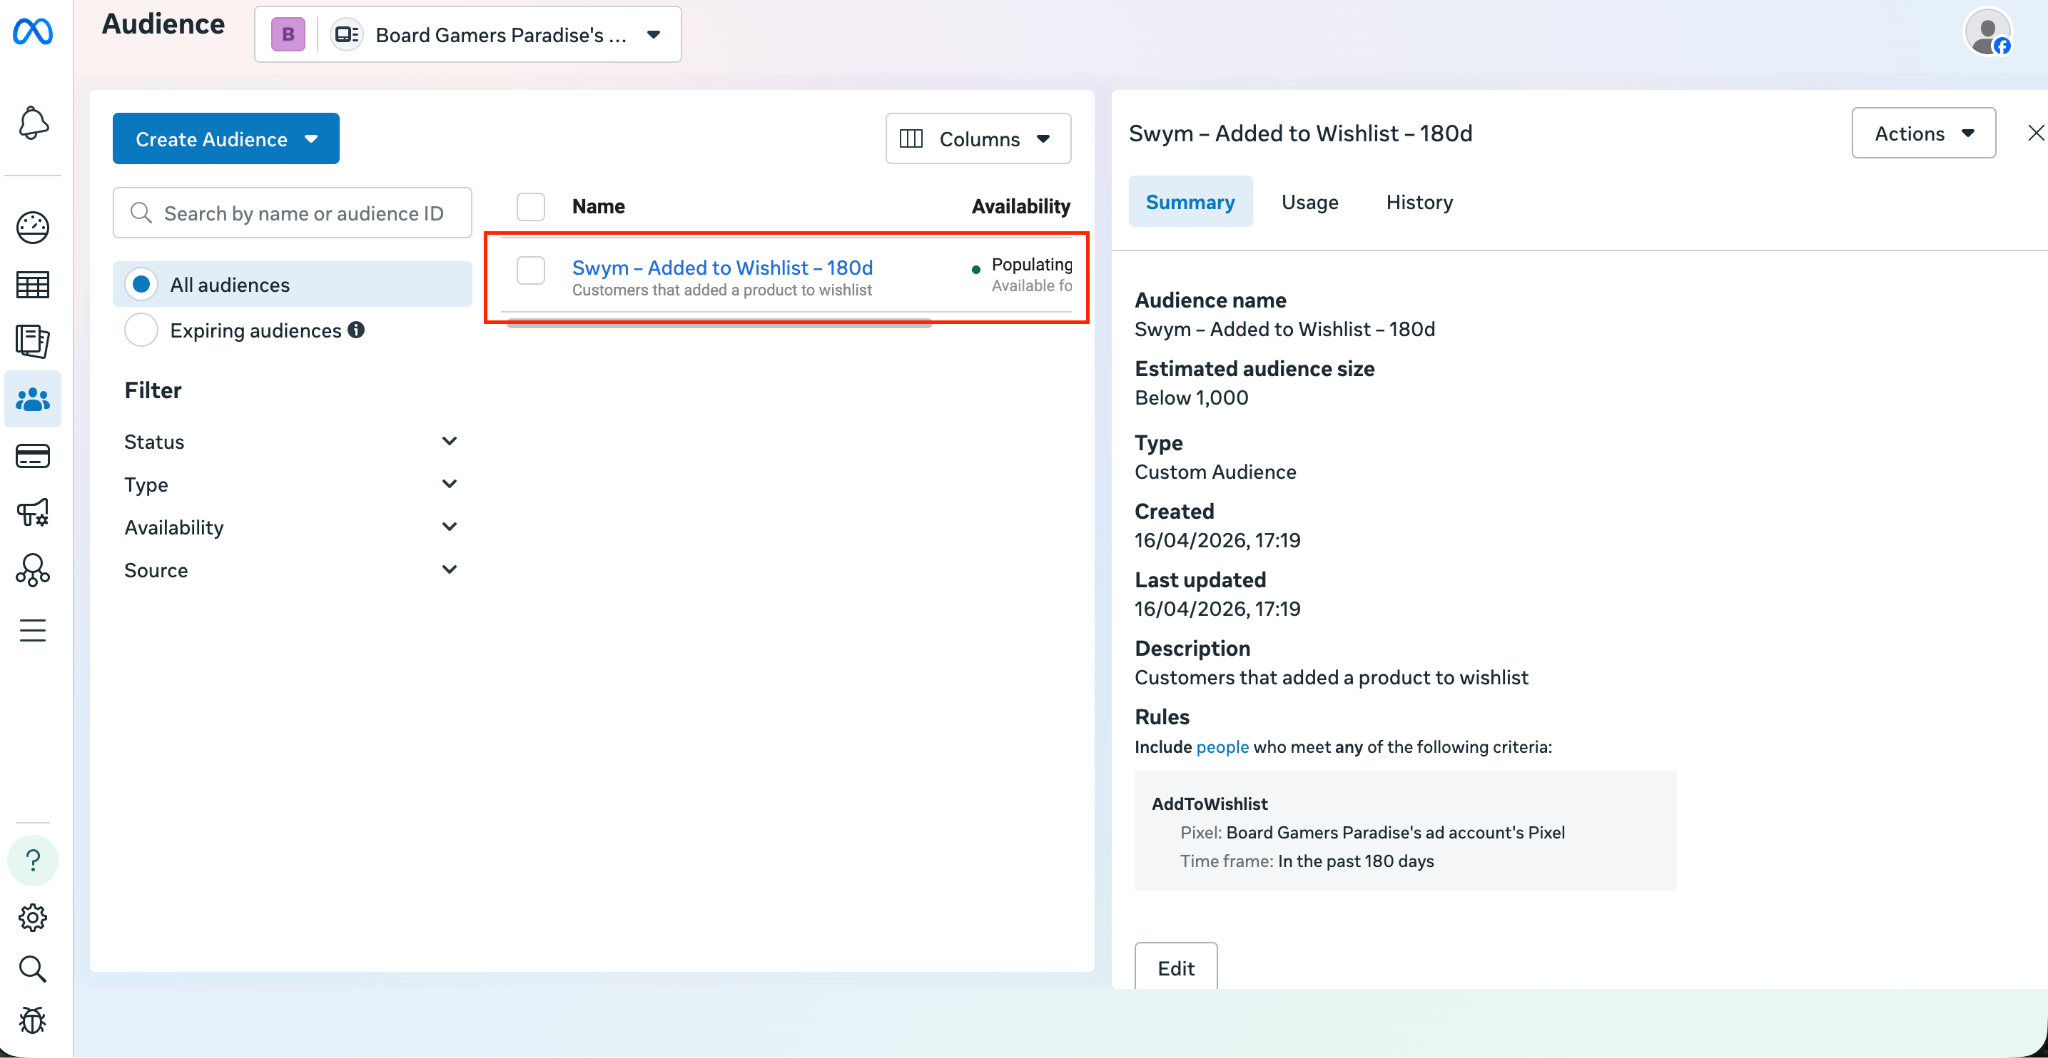
Name the audience something clear, e.g. "Swym – Added to Wishlist – 180d"
Click Create Audience
Why 180 days? Wishlist items often reflect purchase intent that plays out over weeks or months — seasonal purchases, gifts, considered buys. A 180-day window ensures you capture this longer buying cycle without letting high-intent signals go to waste.
3.2 Exclude Recent Purchasers
To avoid spending budget on people who've already converted, add an exclusion rule:
In the same audience setup (or by editing the audience), click "Exclude"
Select the "Purchase" event
Set the exclusion window to 30 days (or whatever matches your typical purchase-to-delivery cycle)
This ensures your ads only reach shoppers who saved products but haven't yet bought them.
3.3 Wait for the Audience to Build
Meta requires a minimum audience size before it becomes usable for ad targeting (typically at least a few hundred people). While the audience is building:
You'll see the status as "Populating" in the Audiences dashboard
Once ready, the status changes to "Ready"
Depending on your store traffic, this can take anywhere from a few days to a couple of weeks
Step 4: Create Your Dynamic Product Ads Campaign
Dynamic Product Ads automatically show each shopper the products they specifically interacted with — in this case, the exact items they wishlisted — pulling creative assets directly from your synced catalog.
4.1 Create a New Campaign
In Meta Ads Manager, click "Create"
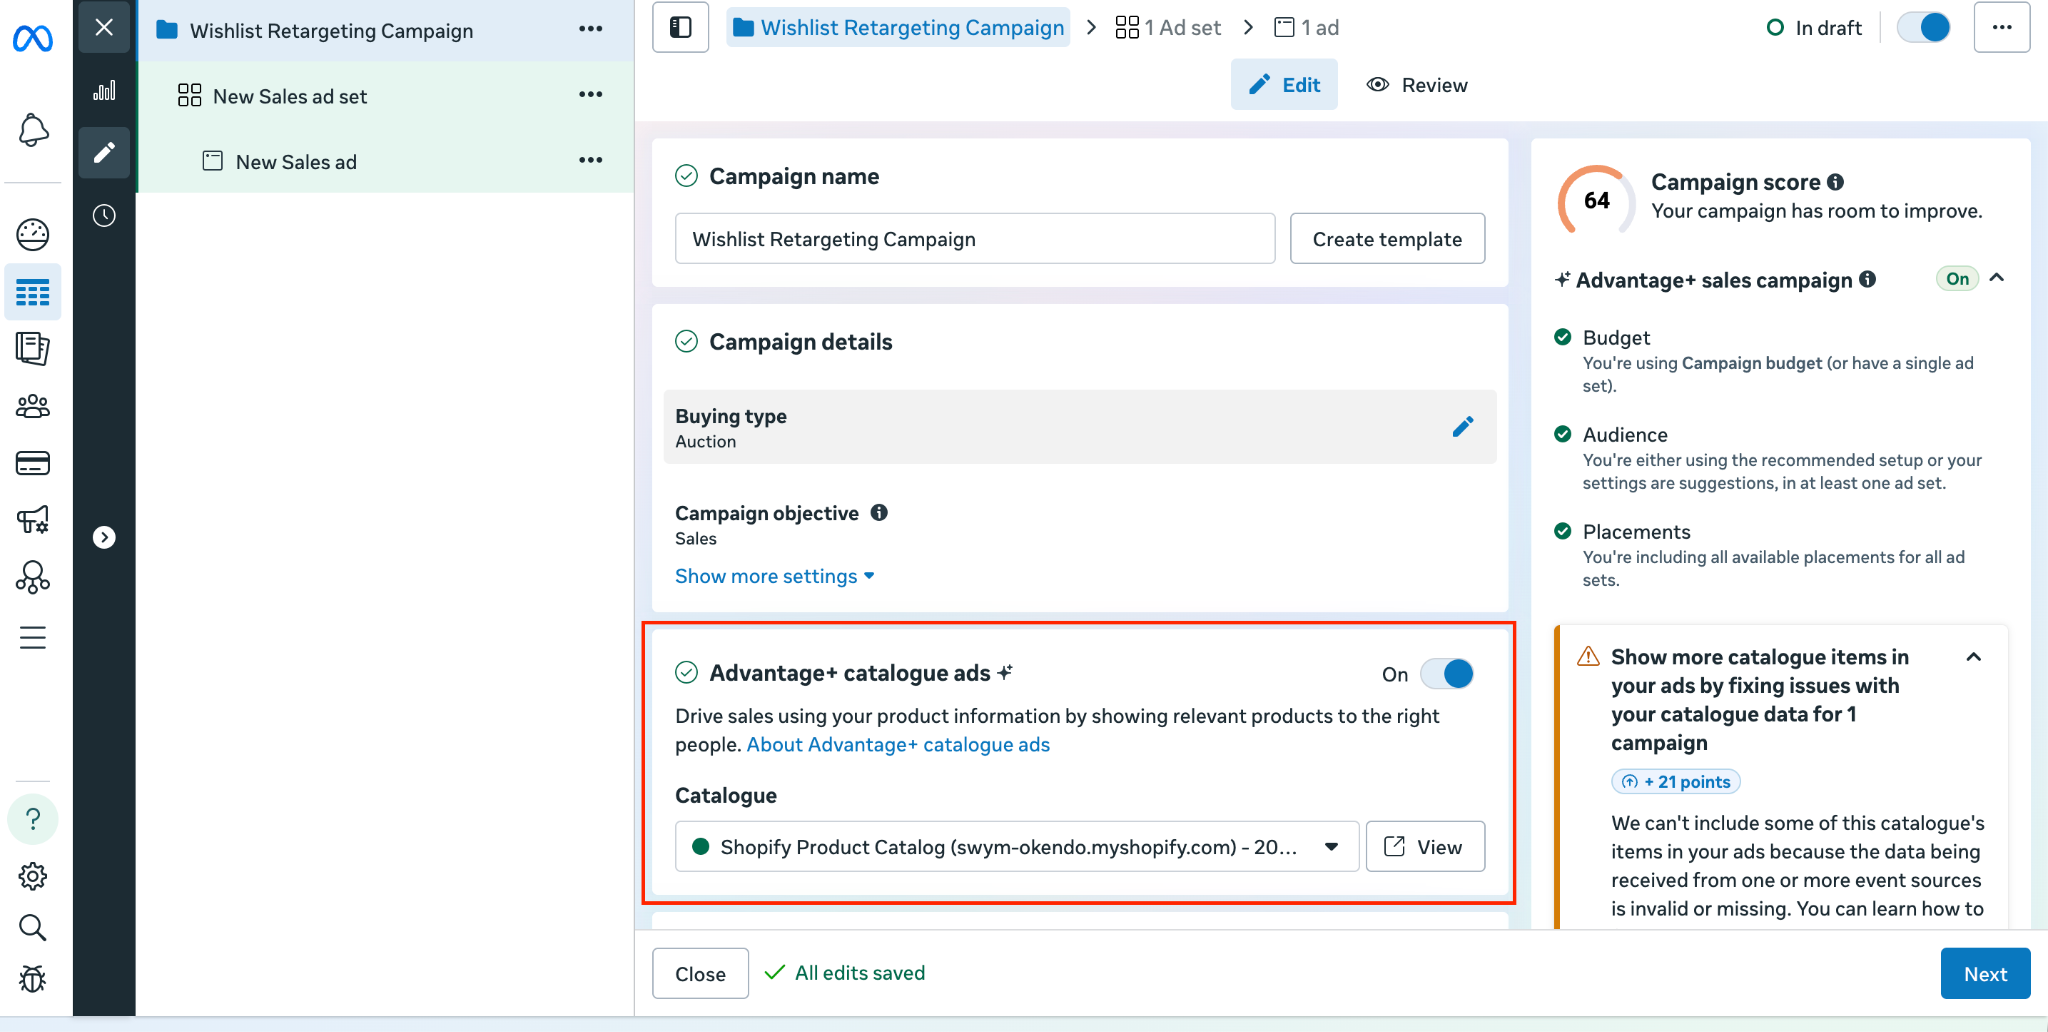
Choose "Sales" as your campaign objective
Select “Advantage+ Catalogue Ads" when prompted for the type of sales campaign
Choose the product catalog you synced from Shopify
4.2 Set Up the Ad Set
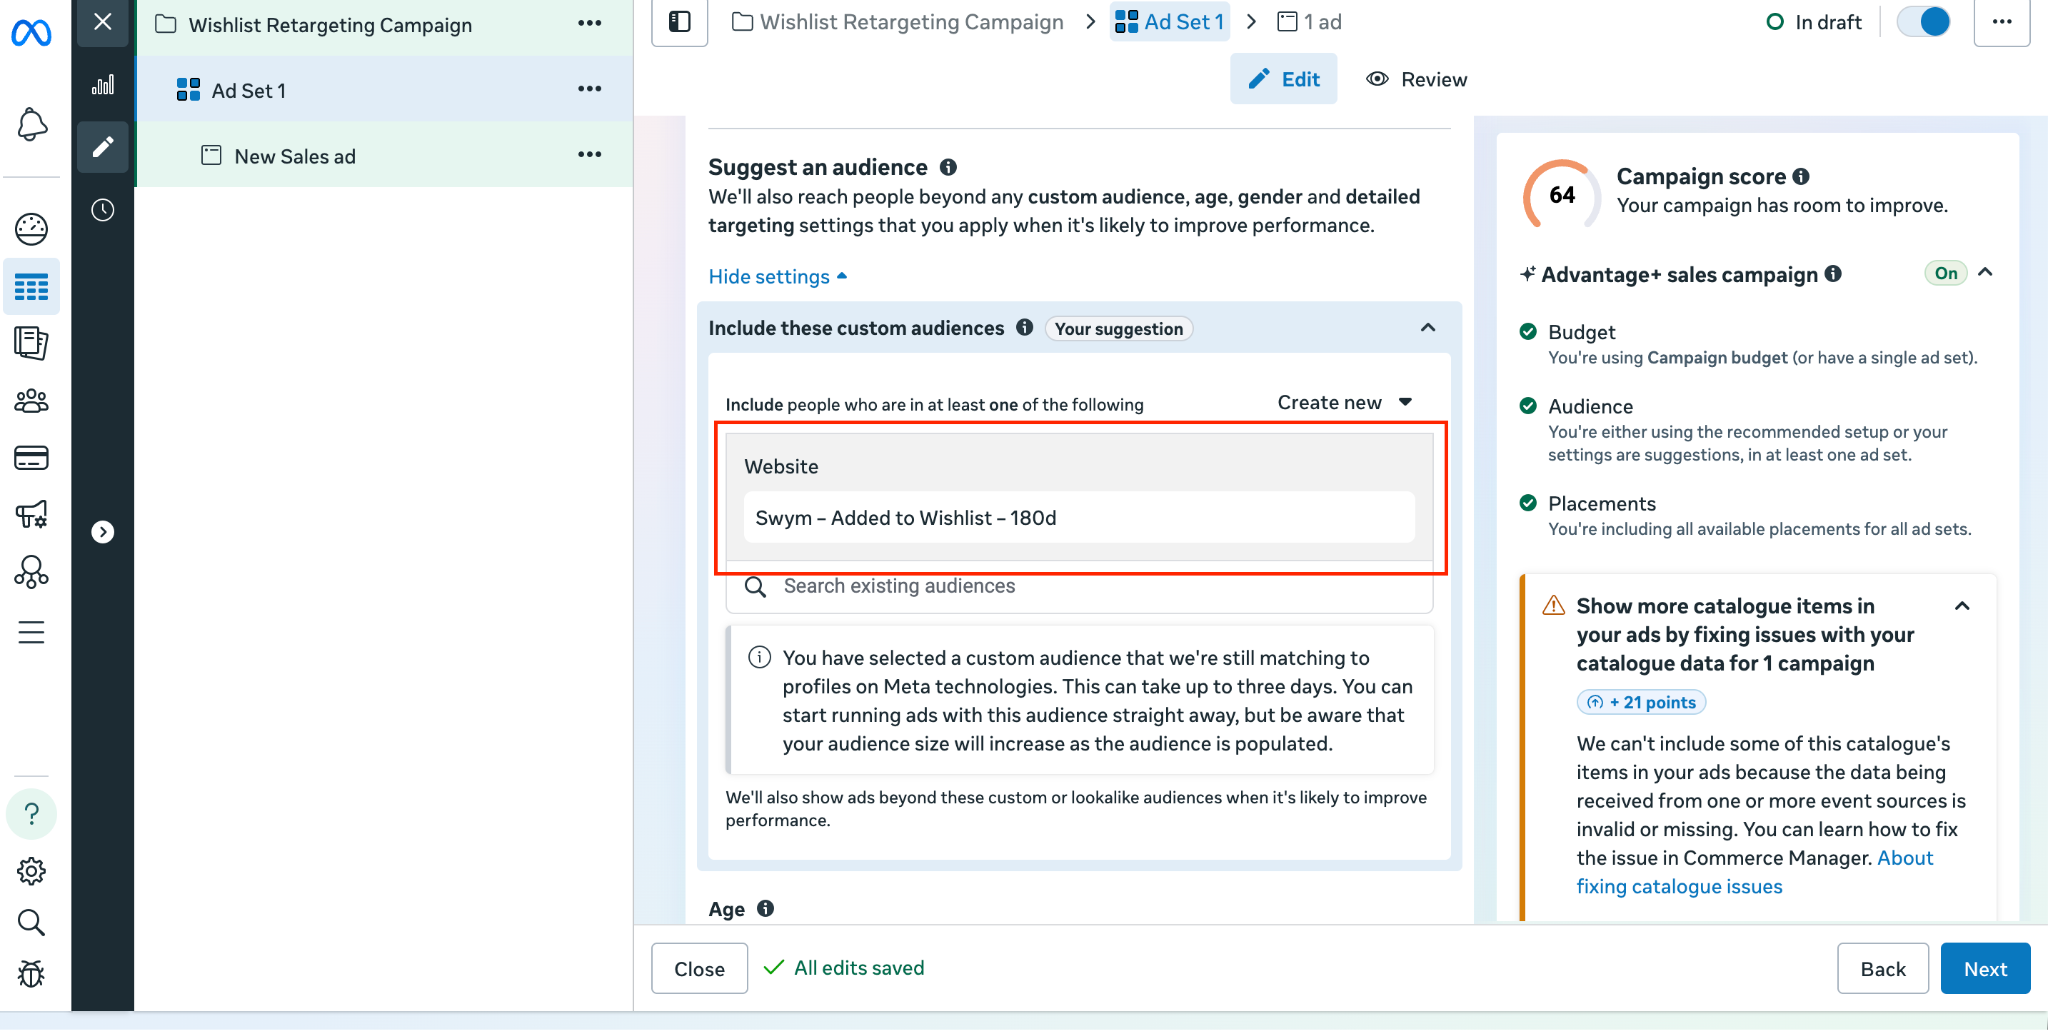
Under Audience, select your "Swym – Added to Wishlist – 180d" Custom Audience
Set your budget (daily or lifetime — start with a daily budget for easier control)
Set placements — Advantage+ Placements is recommended to let Meta optimize across Facebook, Instagram, Reels, and Stories
Set your campaign dates
4.3 Configure the Dynamic Ad Creative
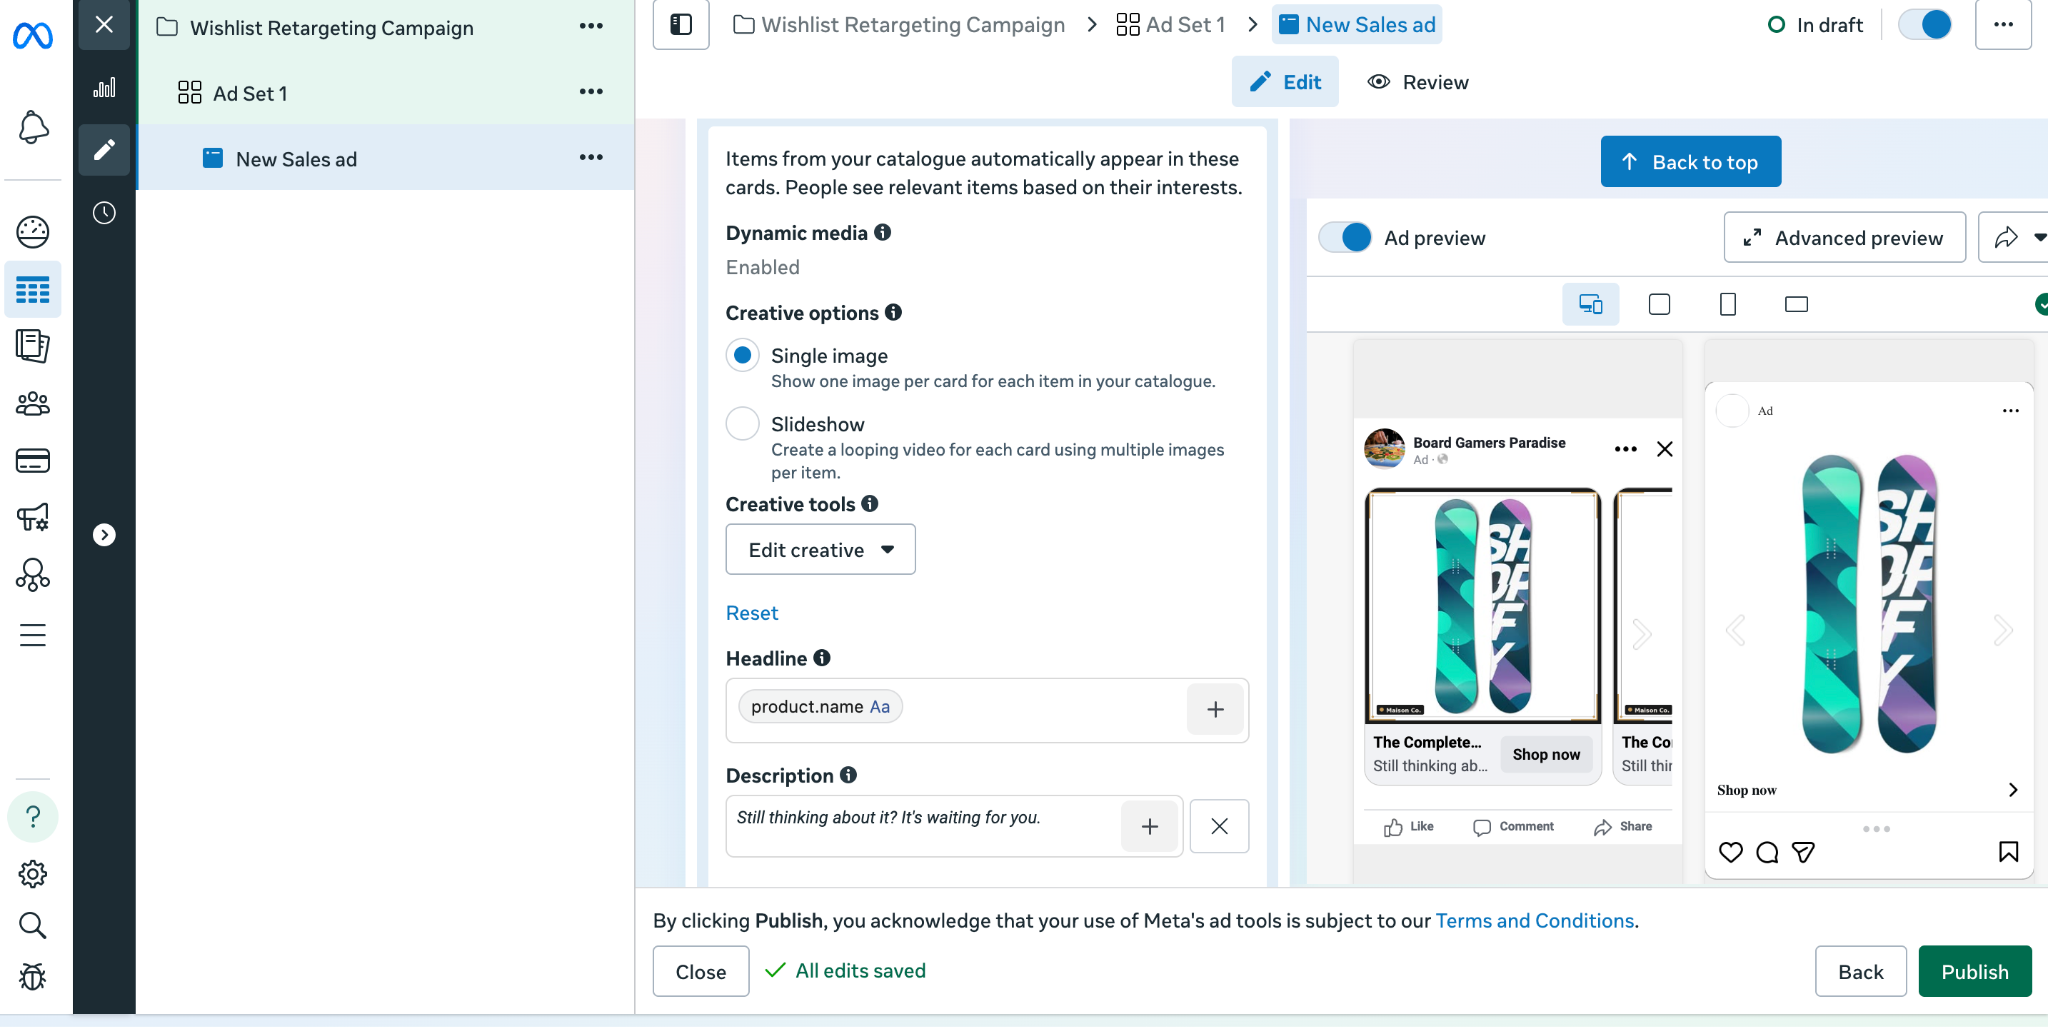
Under Ad Creative, select "Dynamic formats and creative"
Meta will automatically pull product images, names, and prices from your catalog
Use the Creative tools > Add a frame to frame products well — particularly useful for apparel, beauty, and home goods where composition matters
Write primary text that speaks to the wishlist mindset. Some examples:
"Still thinking about it? It's waiting for you.""Your wishlist is calling — grab it before it's gone.""The [product name] you saved is still available. Don't miss out."
Add a strong Call to Action — "Shop Now" or "Buy Now" work well for retargeting audiences who already know your brand
💡 Creative tip: For retargeting (bottom-of-funnel), lean into scarcity and convenience — "Still in stock," "Limited availability," or a time-limited discount. Save broader brand messaging for Lookalike campaigns.
4.4 Review and Launch
Double-check:
✅ Correct audience selected
✅ Purchase exclusion applied
✅ Catalog connected and products showing in preview
✅ Ad copy and CTA reviewed
✅ Budget and dates confirmed
Click Publish.
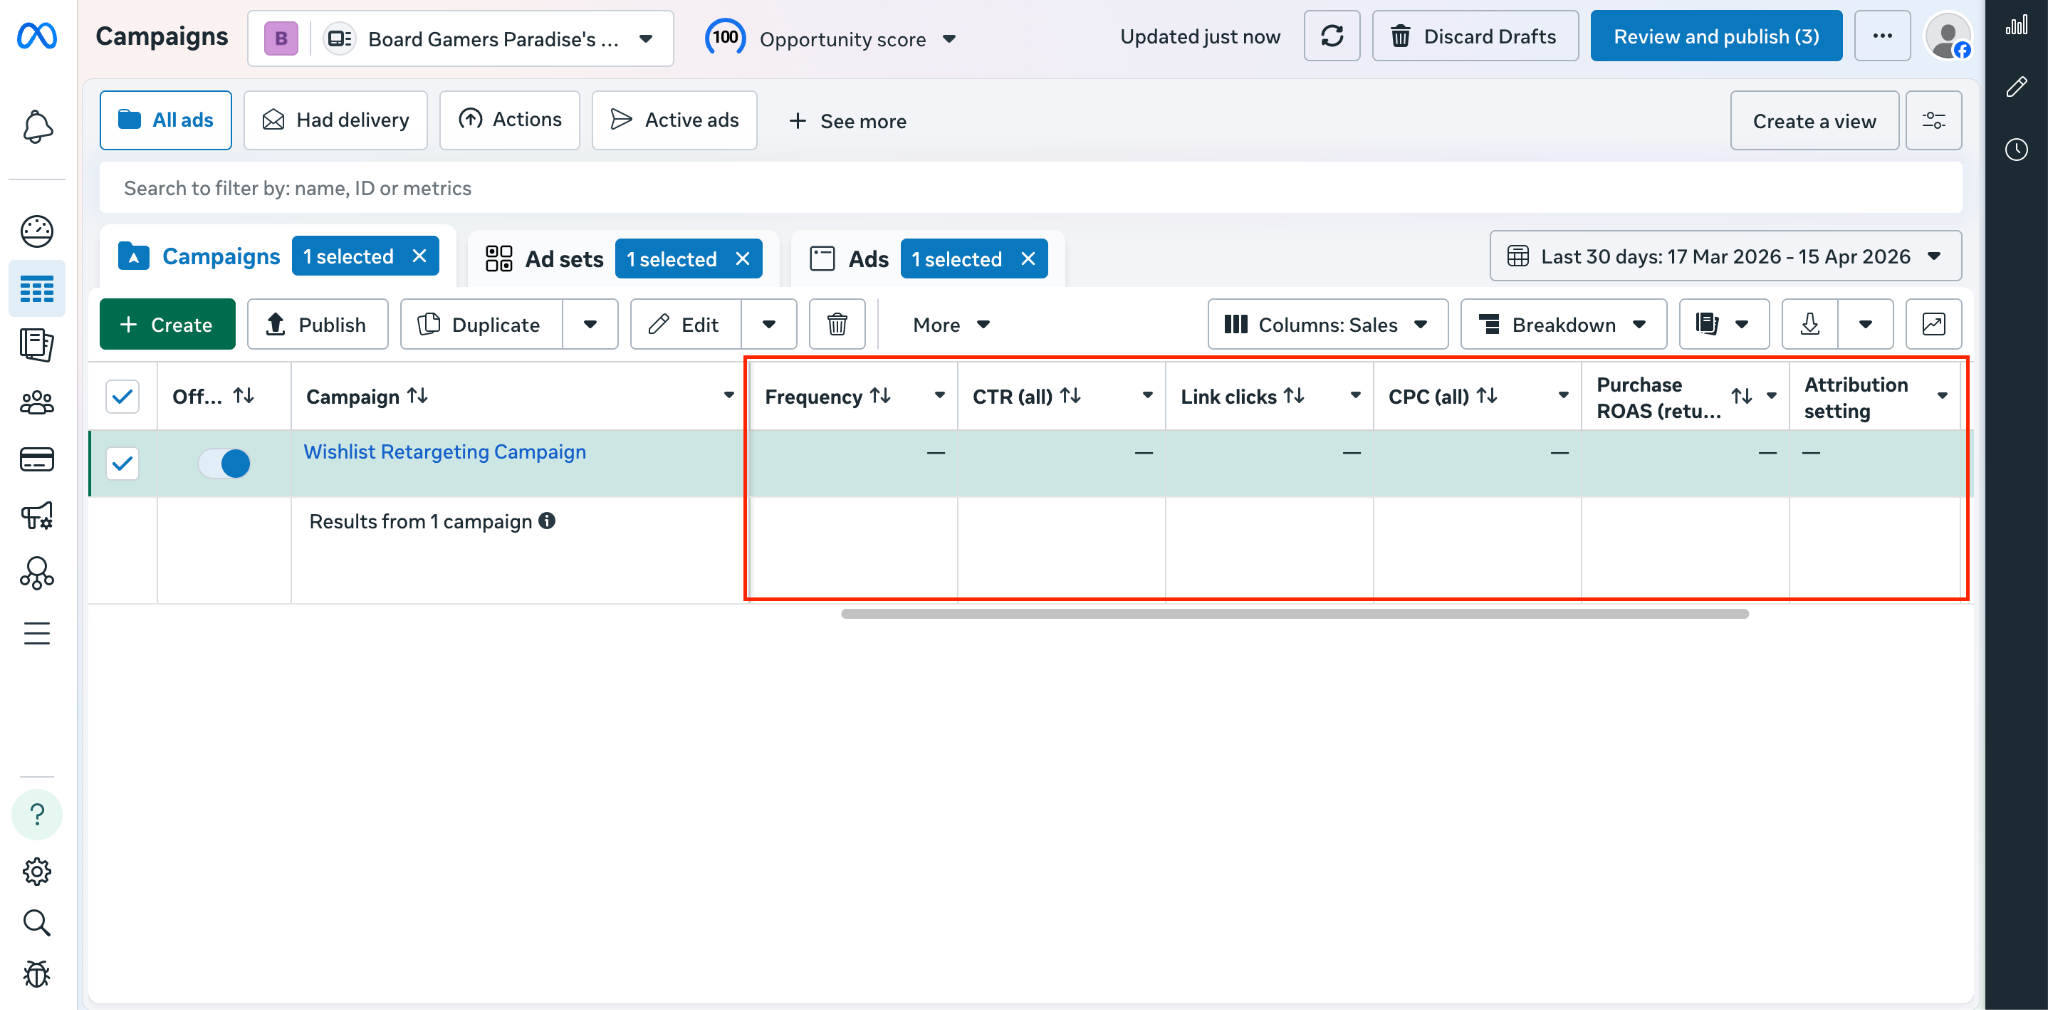
Step 5: Monitor Performance and Optimise
Once the campaign is live, give it at least 5–7 days before making significant changes — Meta's algorithm needs time to optimise delivery.
Key Metrics to Watch
Metric
What it tells you
ROAS (Return on Ad Spend)
Primary success indicator — aim for 3x+ for retargeting
CTR (Click-Through Rate)
How compelling your ad creative is
Frequency
How often the same person sees the ad — keep below 3–4 to avoid fatigue
Cost per Purchase
Efficiency of the campaign
Conversion Rate
How well your landing page/product page converts
Optimisation Tips
Low CTR? Test new ad copy or try carousel format to show multiple wishlisted products
High frequency, low conversions? Refresh creative or tighten the audience window (e.g., 90 days instead of 180)
High CTR but low conversions? The issue may be on the product page — review pricing, imagery, and reviews
Audience too small? Broaden to include other high-intent events (e.g., also include shoppers who viewed products multiple times)
Step 6: Scale with Lookalike Audiences (Top of Funnel)
Once your Custom Audience has at least 100–1,000 people (more is better), you can build a Lookalike Audience — Meta will find new users who share characteristics with your wishlist shoppers. This is a powerful way to acquire new customers at scale.
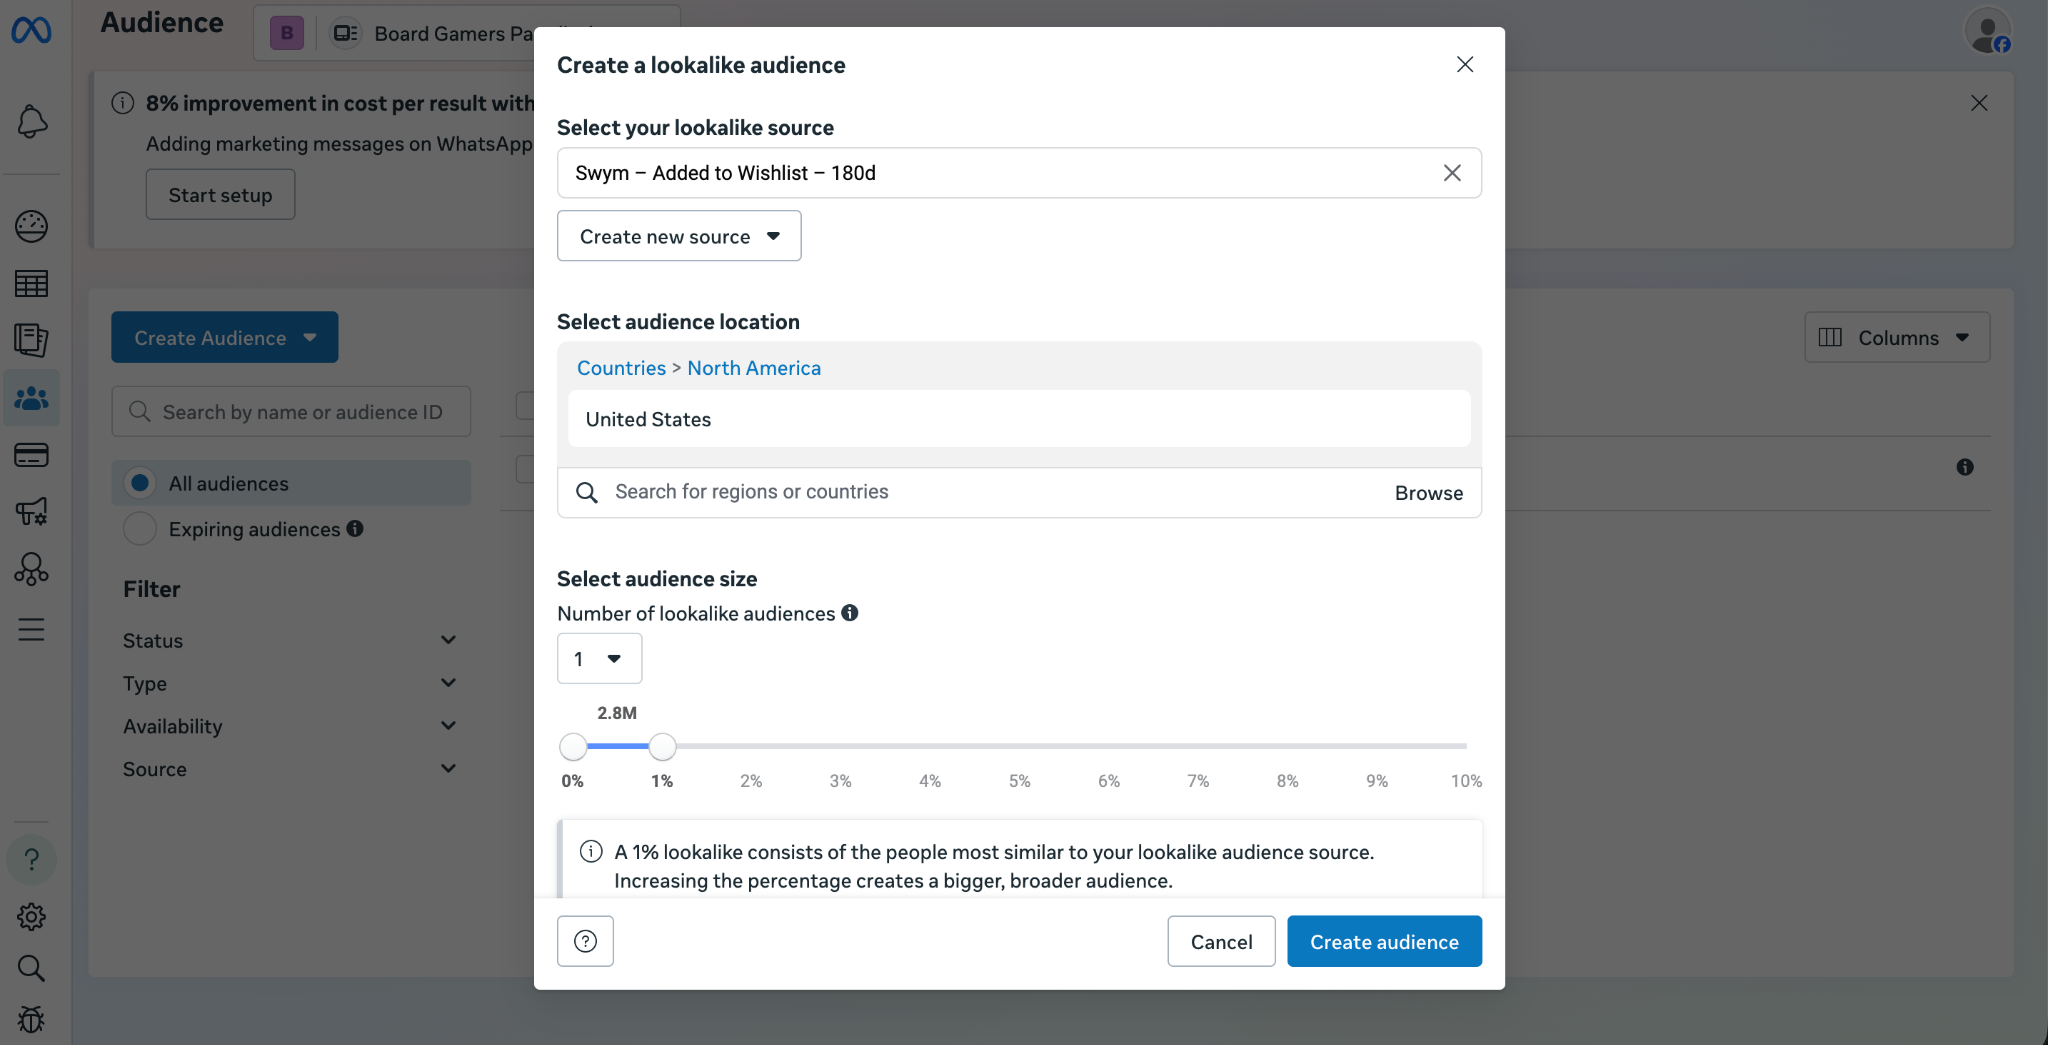
6.1 Create the Lookalike Audience
Go to Meta Ads Manager → Audiences
Click "Create Audience" → "Lookalike Audience"
Select "Swym – Added to Wishlist – 180d" as your source audience
Choose your target country/region
Set the audience size — 1% is the most similar to your source (recommended to start); 2–5% casts a wider net
6.2 Run a Separate Campaign for Lookalikes
Create a new campaign targeting this Lookalike Audience. Key differences from your retargeting campaign:
Objective: You can still use Sales, but Awareness or Traffic campaigns can work well at the top of funnel
Creative: Use brand-forward messaging — introduce your store, highlight bestsellers, or promote a hero product
Exclude your Custom Audience from this campaign so retargeting and prospecting don't overlap
Budget: Lookalike campaigns typically need higher budgets and longer run times to optimise
💡 Pro tip: As your wishlist Custom Audience grows over time, refresh your Lookalike Audience monthly to keep the signal fresh and the targeting sharp.
Summary: Your Full Funnel at a Glance
Shopper adds product to wishlist
        ↓
Swym fires AddToWishlist event → Meta (server-side)
        ↓
Custom Audience builds (180-day window, excludes purchasers)
        ↓
DPA Retargeting Campaign → Show exact wishlisted products
        ↓
Monitor ROAS, optimise copy and creative
        ↓
Build Lookalike Audience → Prospect new customers at scale
Prerequisites Checklist
Before you start, make sure you have:
Swym Wishlist Plus on Starter plan or higher
Active Meta Business Manager account
Meta Pixel ID and System User Access Token ready
Shopify Facebook & Instagram Sales Channel installed and catalog synced
Sufficient store traffic to build an audience (ideally 500+ wishlist events/month for meaningful retargeting)