Send high-intent shopper signals like Wishlist reminders, Save for Later nudges, and Price Drop alerts to Klaviyo and automate personalized campaigns that convert.
Overview
What You'll Learn
How to integrate Klaviyo with Wishlist Plus
What events are sent from Wishlist to Klaviyo
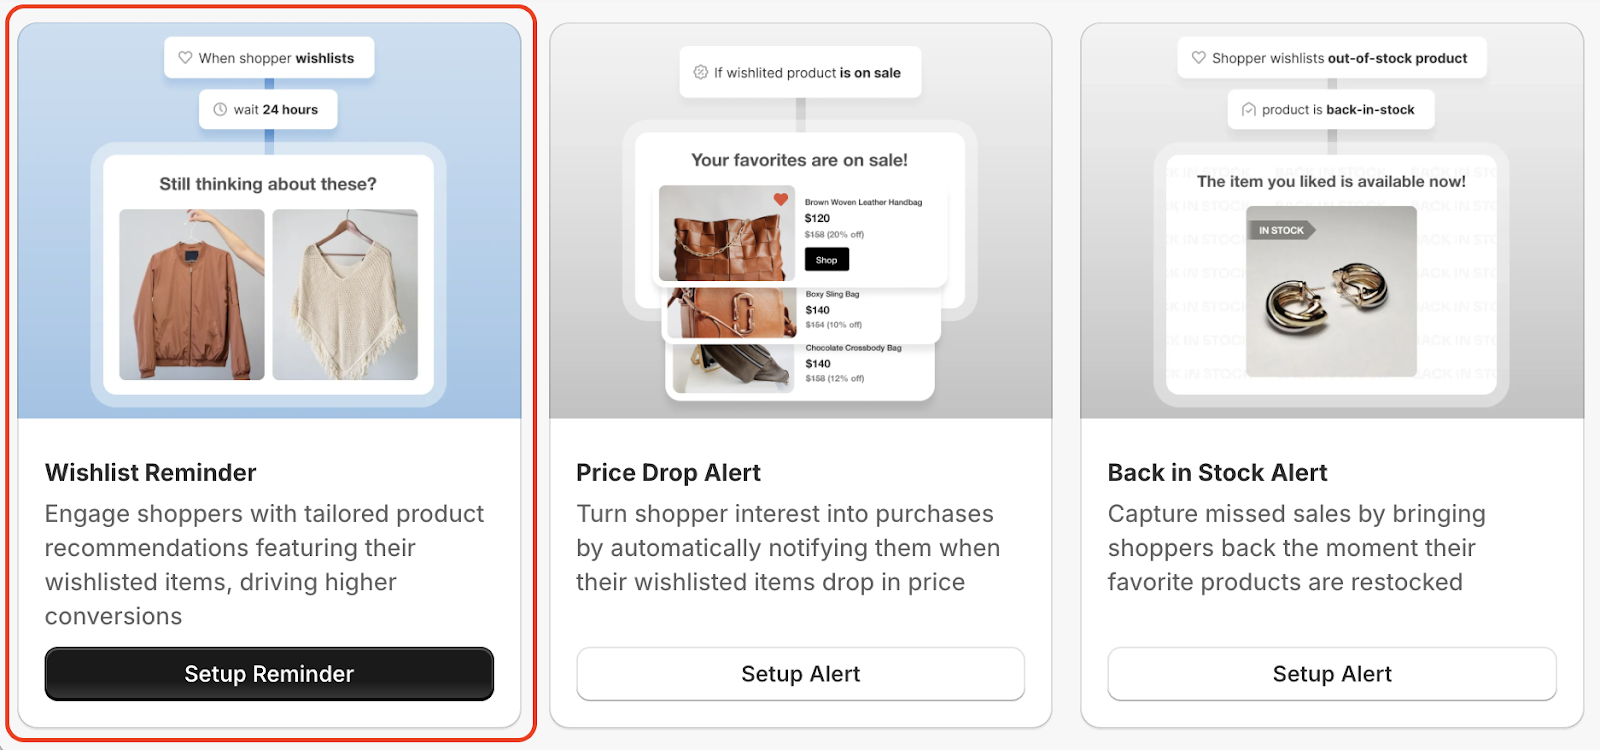
How to enable marketing triggers like Wishlist Reminder, Price Drop, and Back in Stock
How to create flows and templates in Klaviyo using these events
Why This Integration Matters
Automate shopper re-engagement with personalized messages
Improve conversions by acting on real intent signals
Use behavioral triggers to power smarter segmentation
Bring back window shoppers with timely nudges
Prerequisites
01
Wishlist Plus Starter Plan or above
02
Klaviyo Email/SMS Account
03
How To Implement
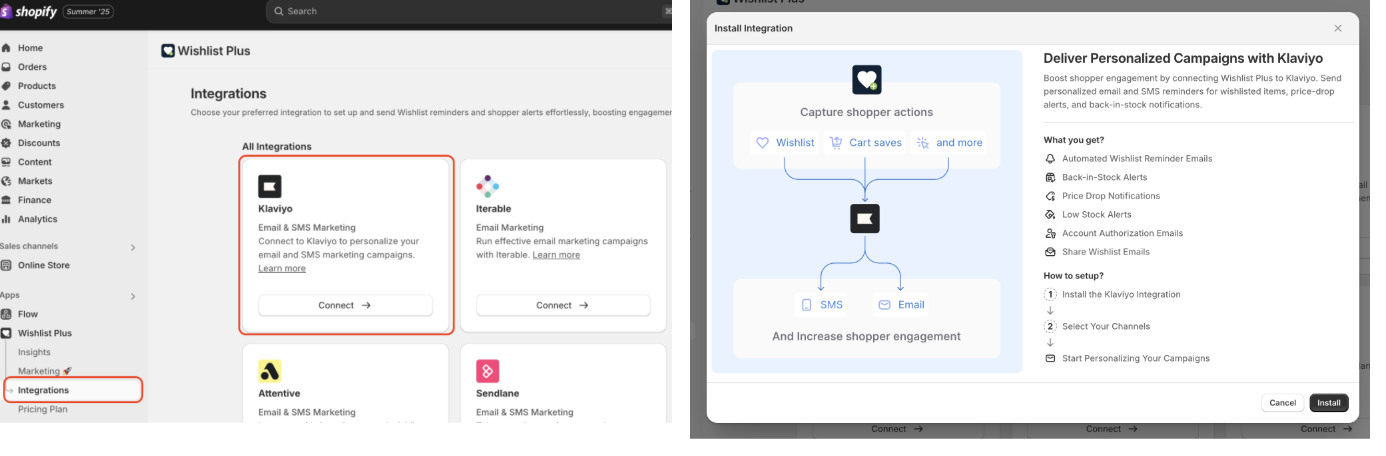
Connect Klaviyo with Wishlist Plus
Step-by-Step Setup
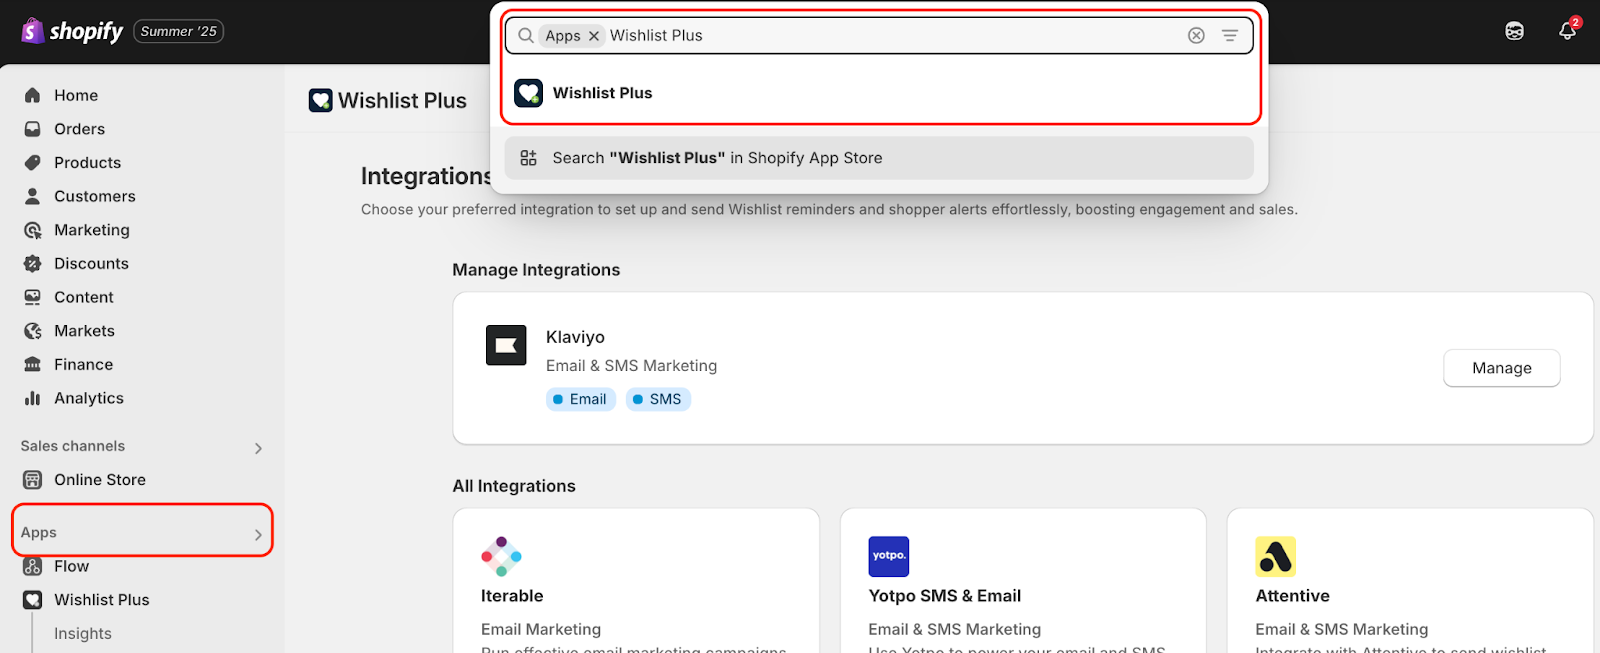
Log in to your Shopify Admin.
Navigate to Apps > Wishlist Plus.
In the Wishlist Plus dashboard, go to the Integration tab.
If you see a locked screen instead of a Connect button, upgrade to a paid Wishlist plan to unlock Klaviyo integration.
Click “Connect & Install.
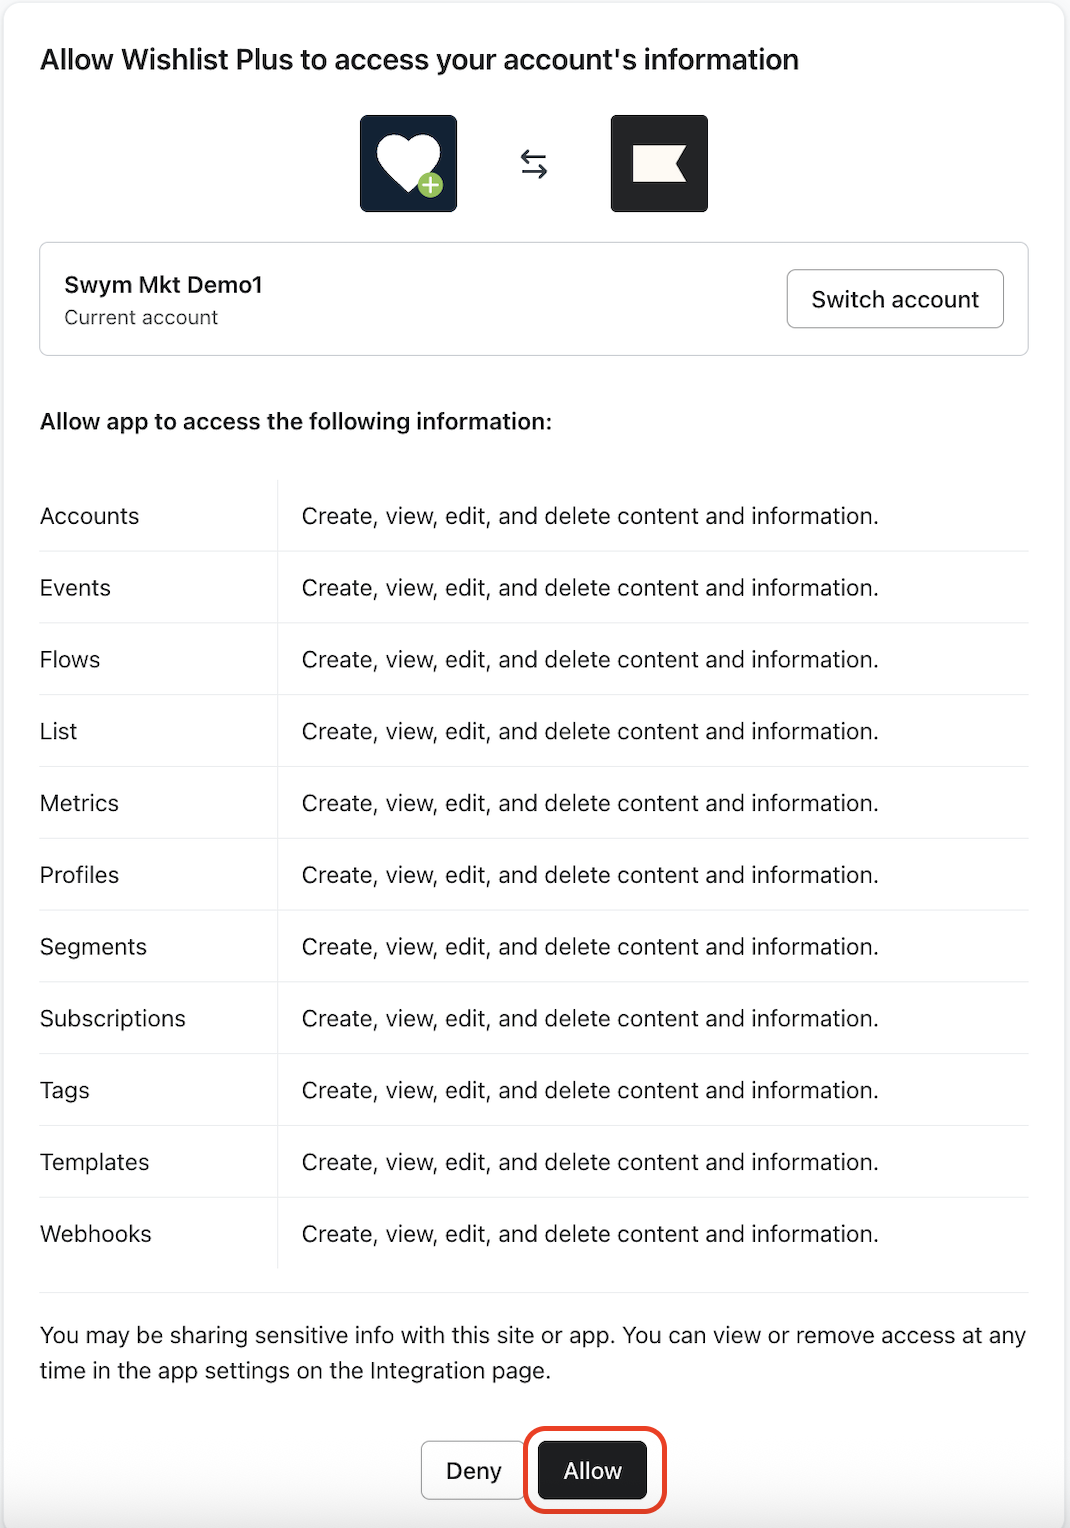
Grant necessary permissions by clicking “Allow.” These are required to push events to Klaviyo.
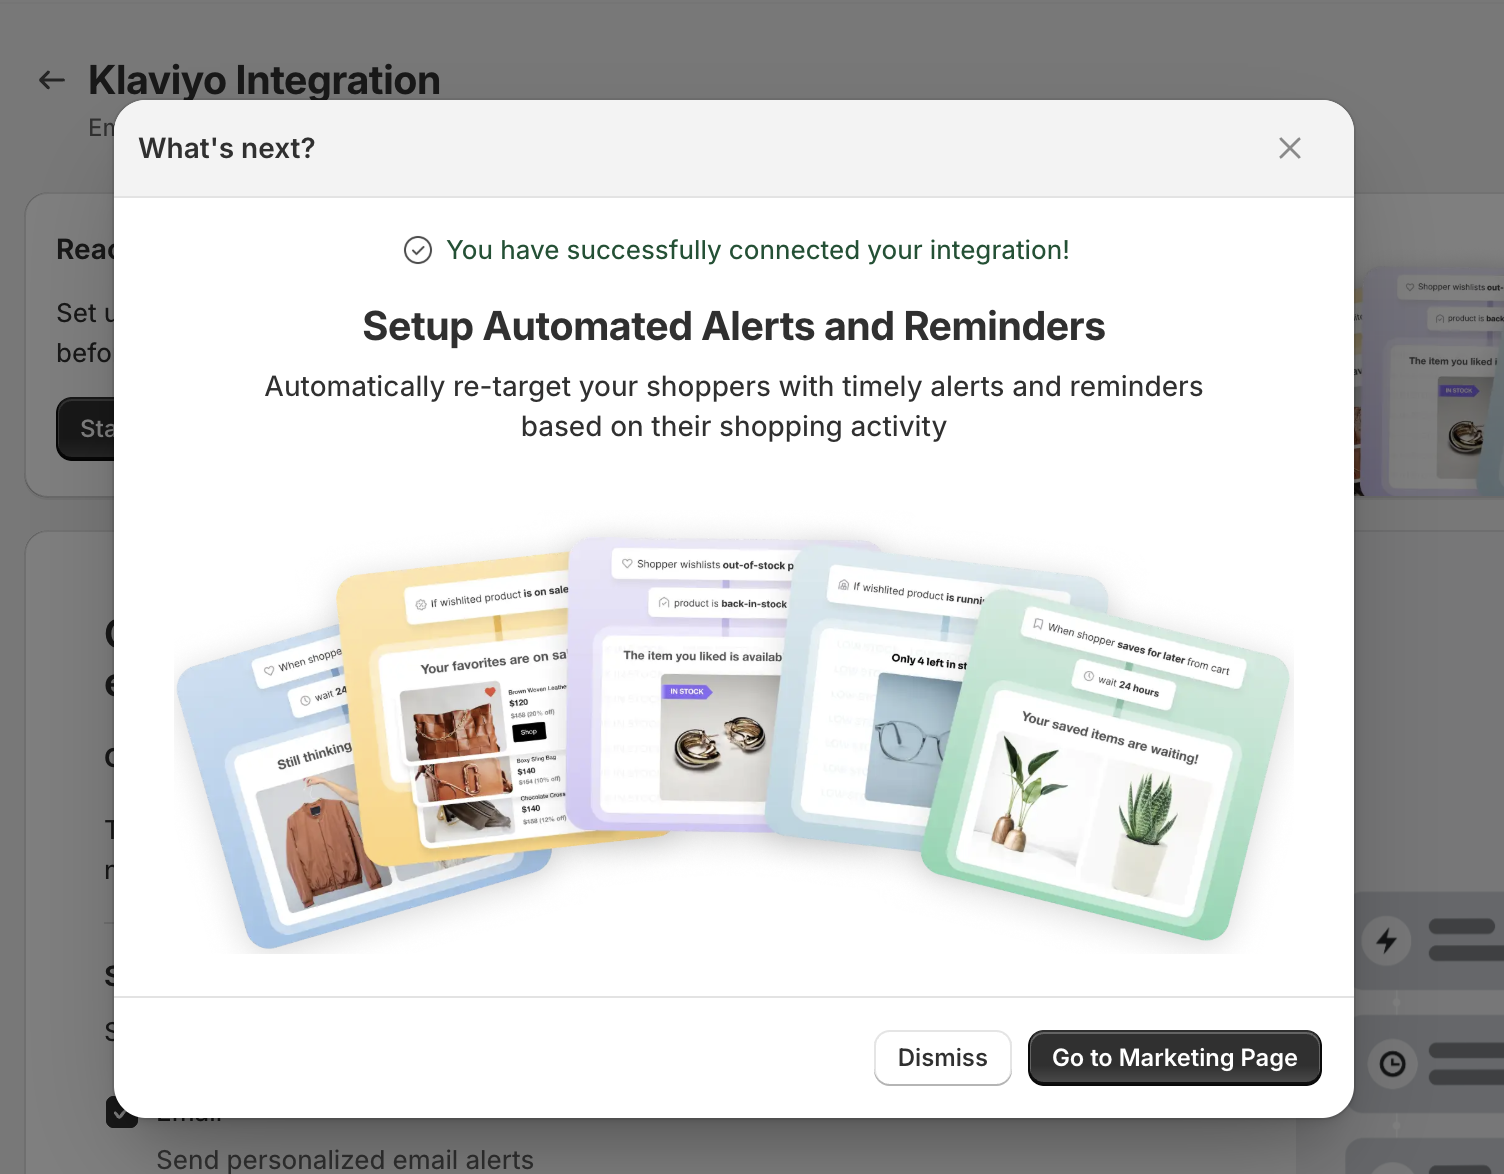
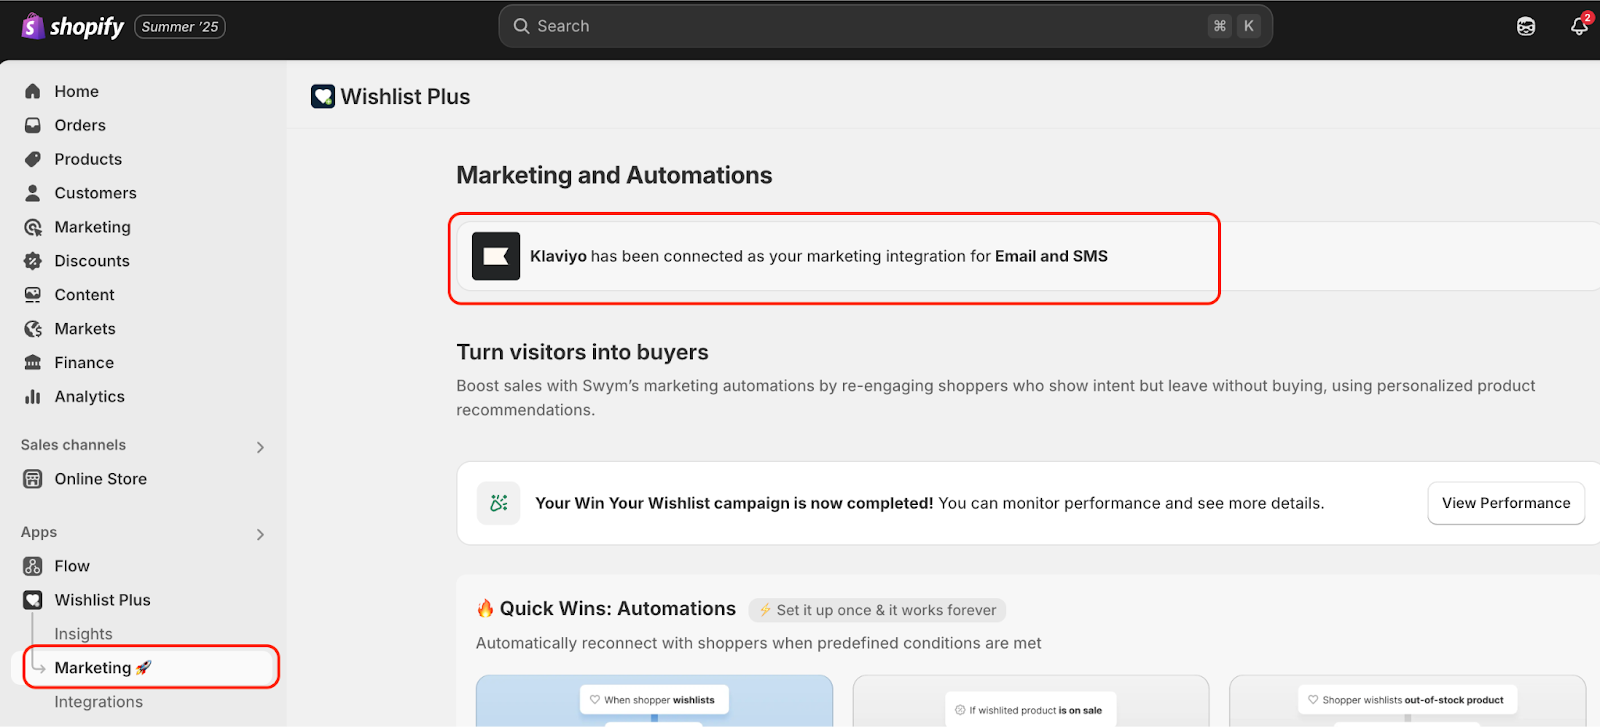
After successful connection, you’ll be prompted to go to the Marketing tab. If not, refresh the page and navigate manually.
8. In the marketing tab, you’ll see Klaviyo has been connected.. Banner. This indicates that Klaviyo is successfully connected with your Wishlist Plus app.
Note: SuccessfulIntegration alone doesn’t send data. You must enable marketing features to begin sending events to Klaviyo. (Enabling marketing features is covered in section 3)
Shopper Events Sent to Klaviyo
(No Action Needed – For Your Reference)
Once features are enabled, the following triggers events will be appear in your Klaviyo account:
Trigger Name in Klaviyo
Description (type of data associated with the trigger)
Swym-wishlistReminder
Sends reminders for wishlisted products
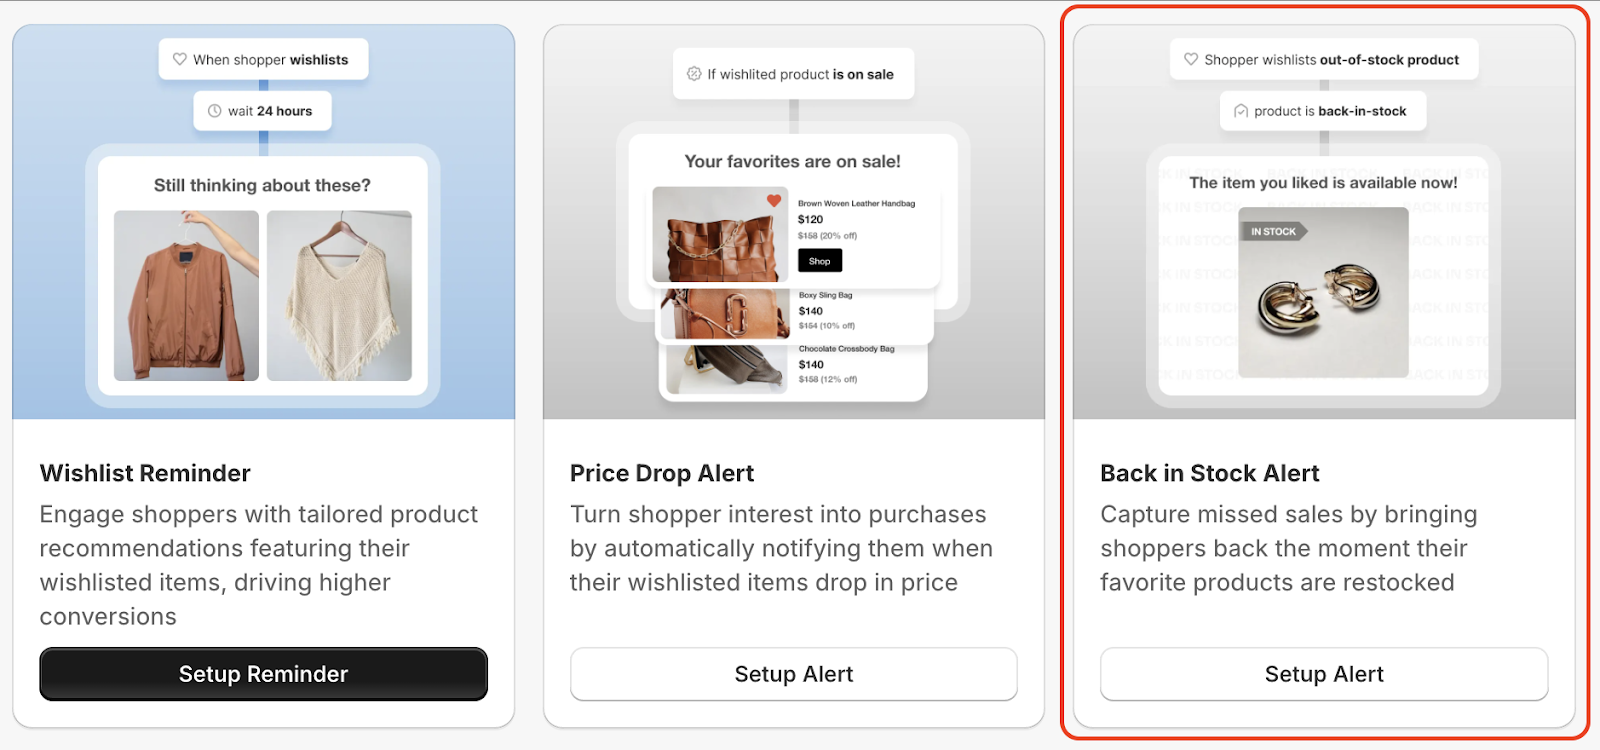
Swym-backinstock
Alerts when a wishlisted out-of-stock product is back in stock
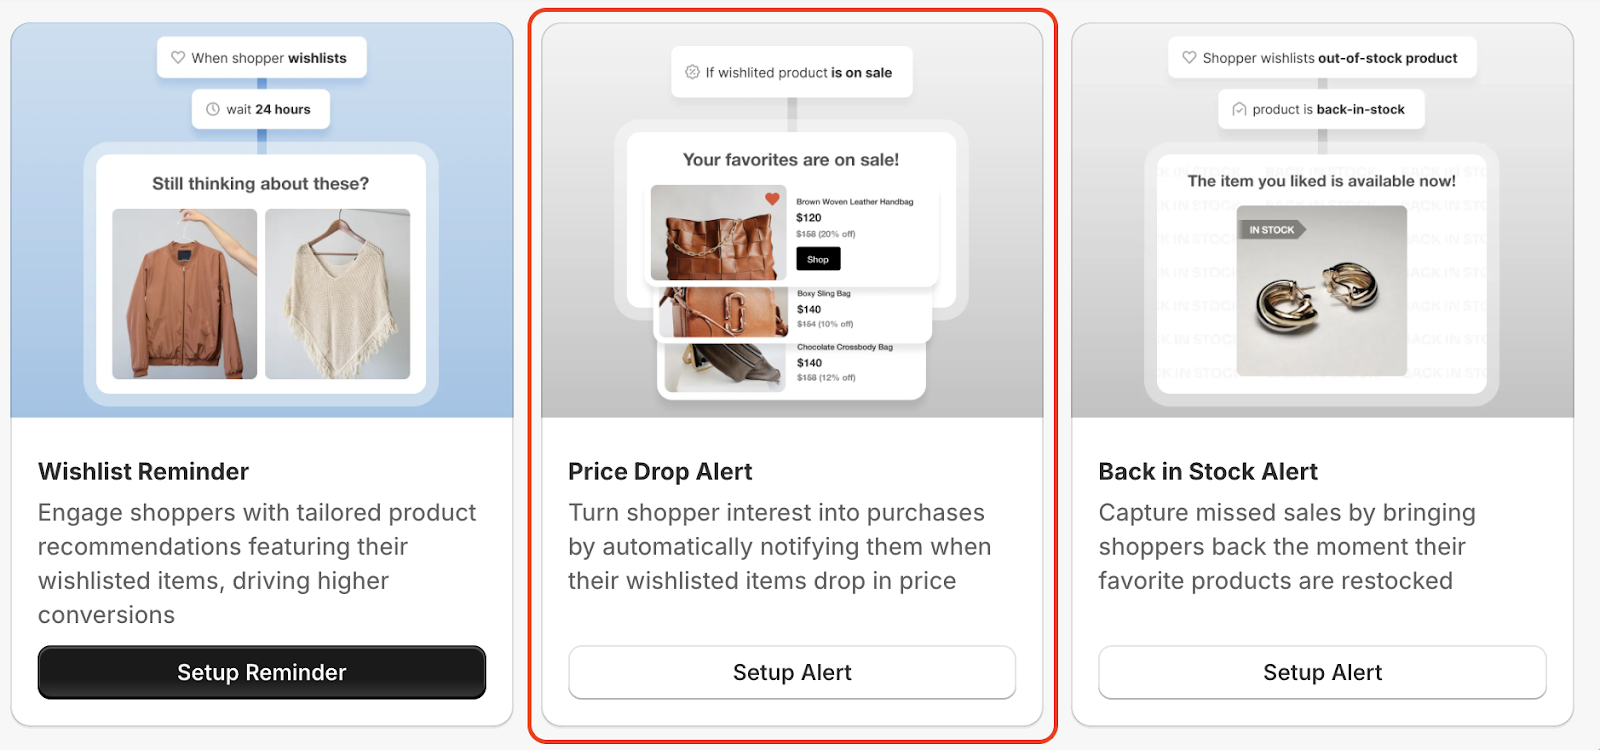
Swym-pricedrop
Alerts when a wishlisted product price drops beyond a set threshold
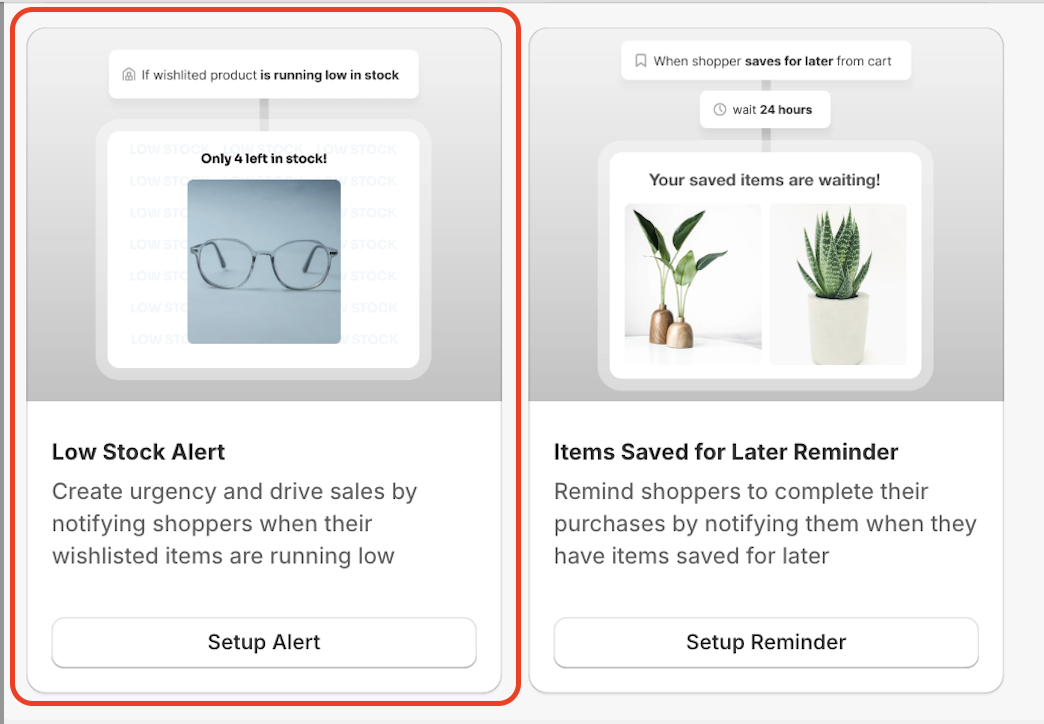
Swym-lowstock
Notifies shoppers of low stock on wishlisted items
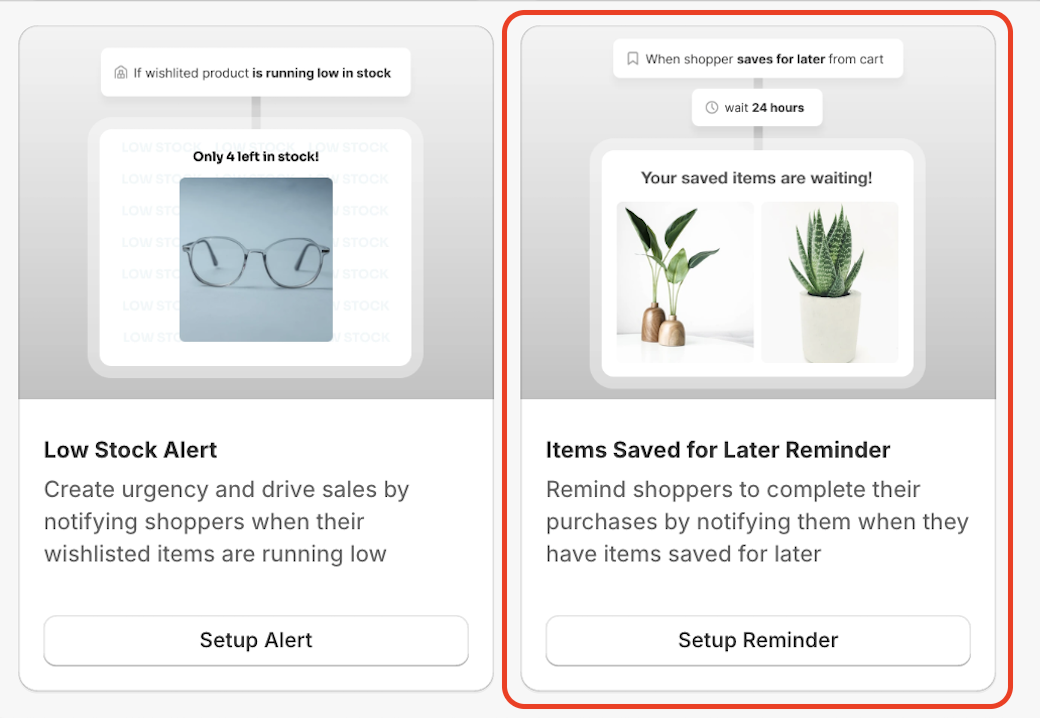
Swym-sflReminder
Reminder for items saved for later in the cart
Swym-digests
Digest data summarizing past behavior for segmentation
Swym-shareWishlist
Sends event when a shopper shares their wishlist
Make sure to use the correct trigger name as listed above while creating the Klaviyo flows.
Events sample data fields:
Field
Description (type of data associated with the trigger)
Each feature must be manually turned on from the Wishlist Plus dashboard.
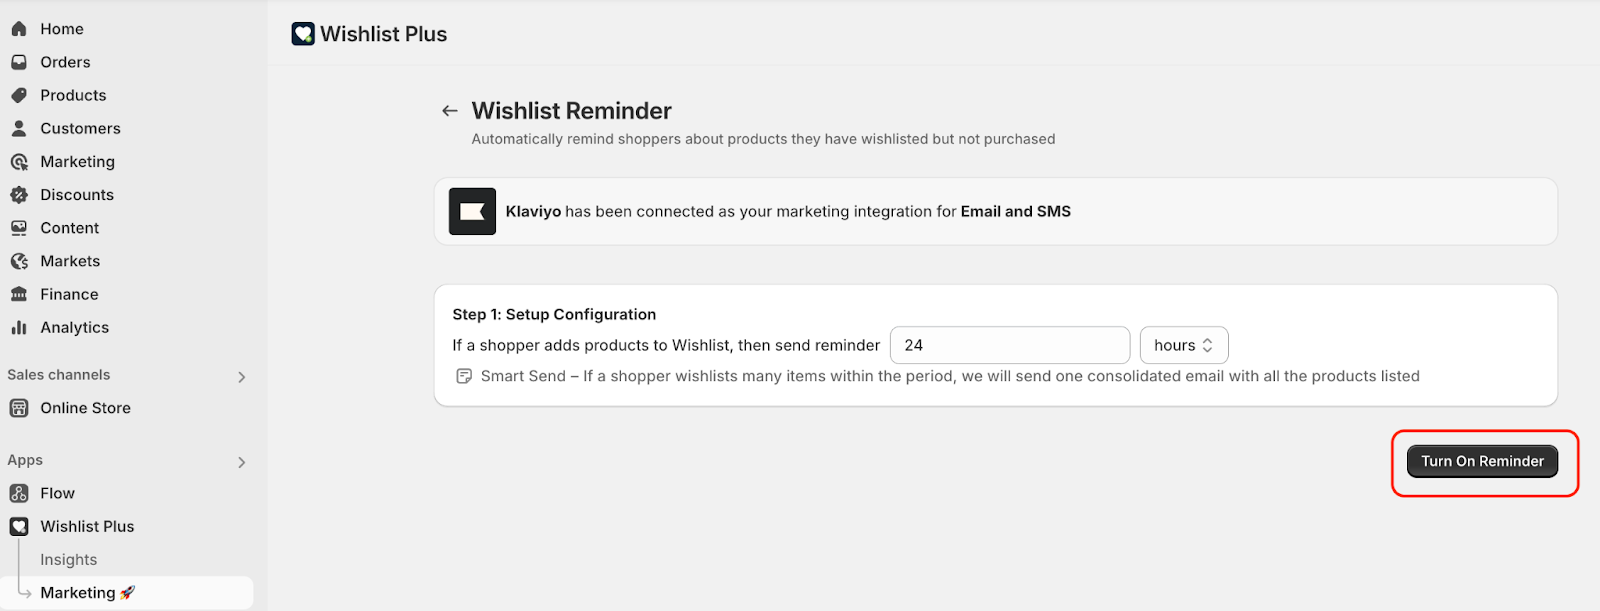
3.1 Enable Wishlist Reminder in the Wishlist Plus App
Go to Marketing > Wishlist Reminder
Set the delay time in hours or in days.
Click Turn On to enable the Reminder.
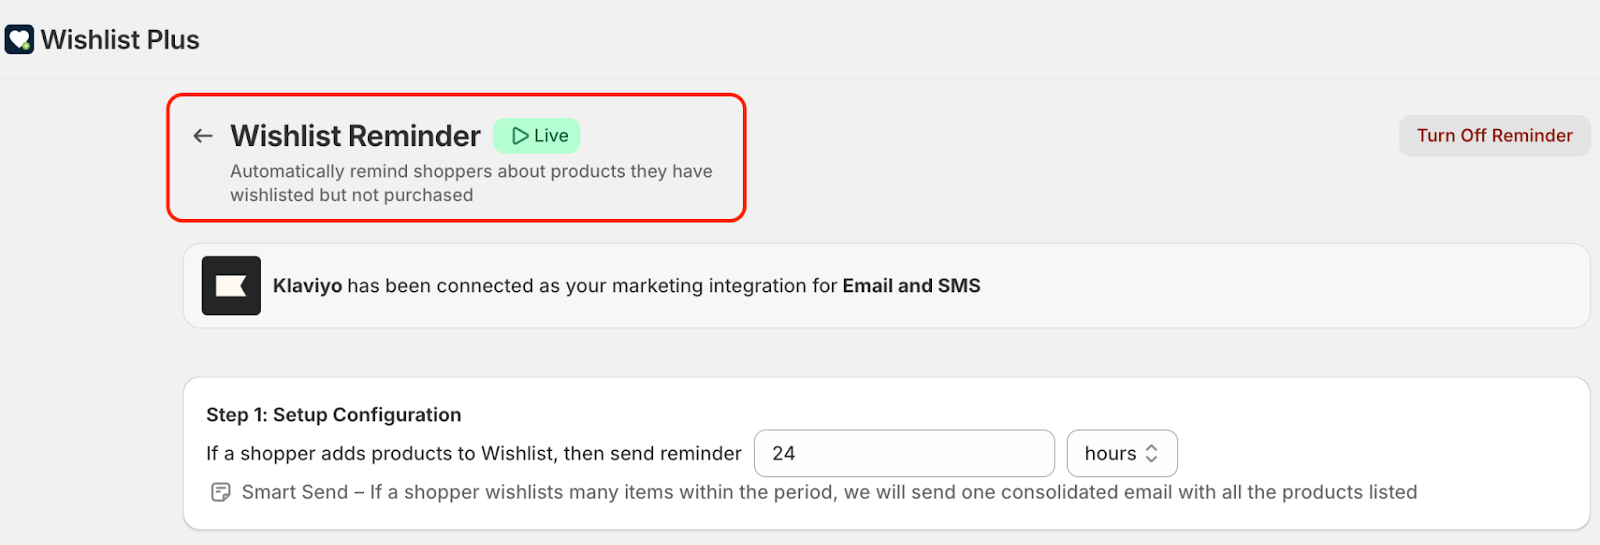
Once the feature is enabled, status will show Live
Your events are now flowing to Klaviyo. But no emails or SMS will be sent until a flow is created in Klaviyo and marked Live.
Setting Up Wishlist Reminder Flow in Klaviyo
Log into Klaviyo. Go to Flows > Create Flow
Choose “Build Your Own Flow”. Name your flow and click Create
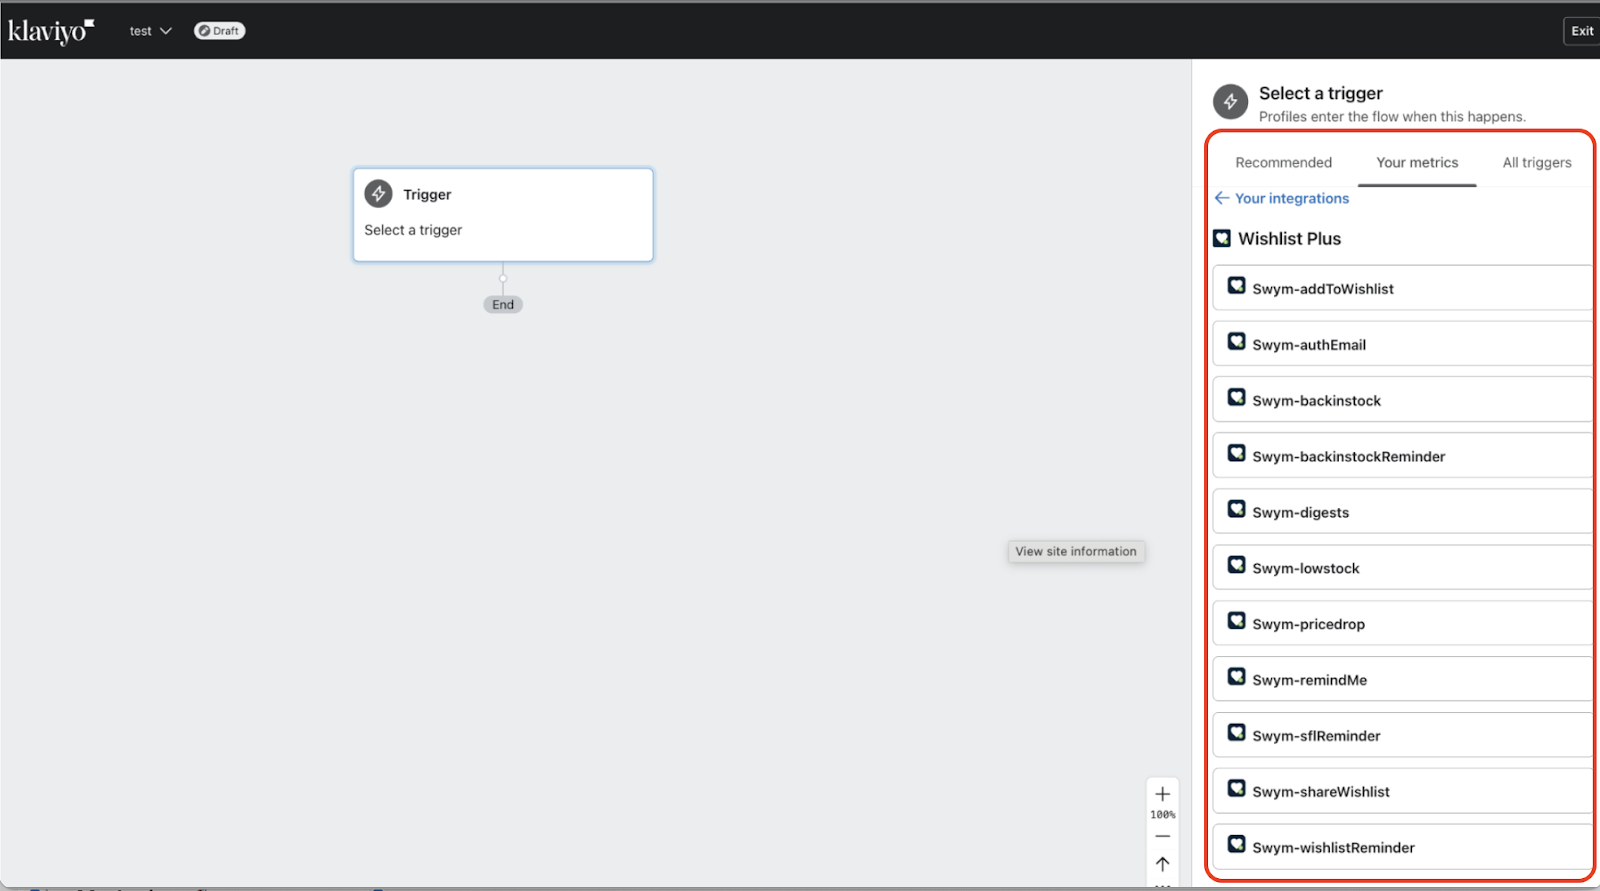
Set Flow Trigger
Choose Metric-Triggered Flow
Select Swym-wishlistReminder
Add profile and trigger filters if needed
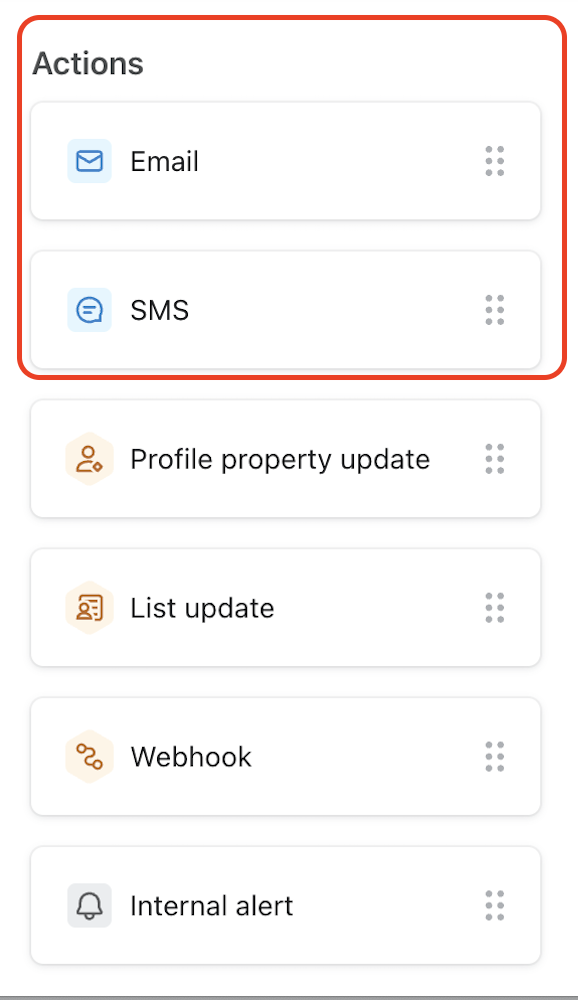
Add Email or SMS blocks
Drag and drop the block
Customize subject line and content
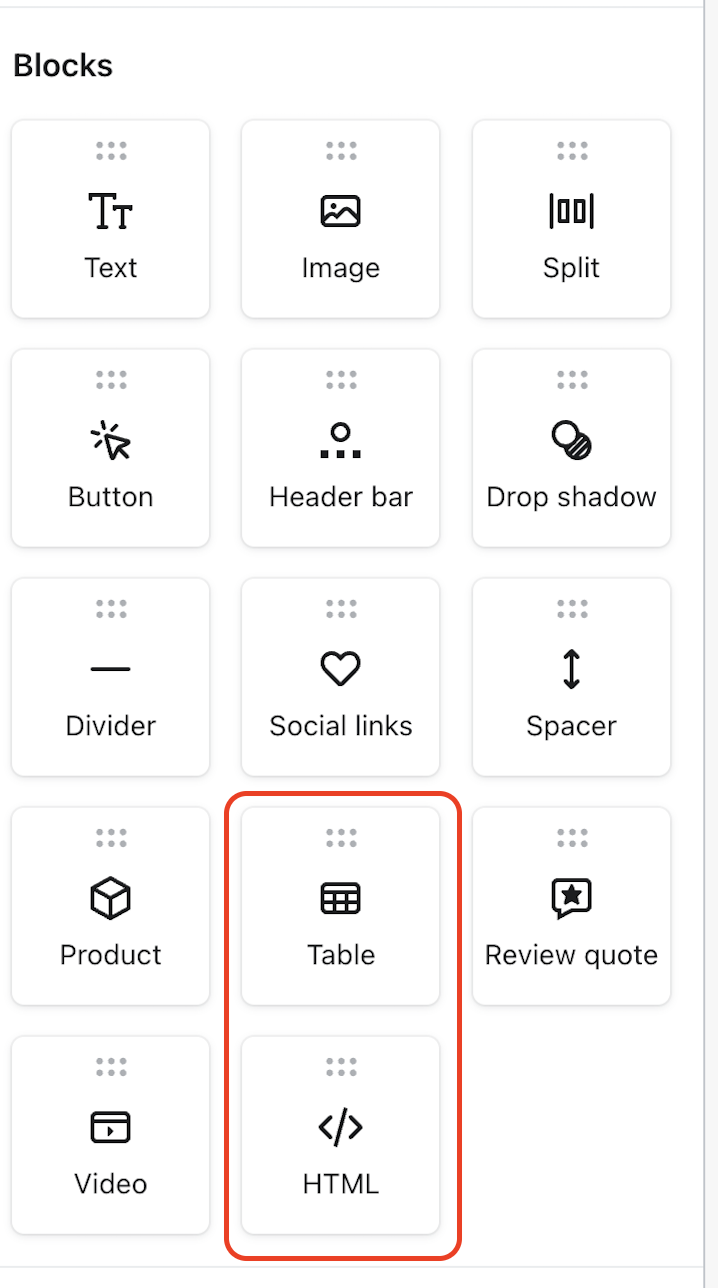
Personalize Product Info by using table or HTML blocks.
Test and Launch
Send test email
Preview template
Set flow status to Live
Watch the detailed setup video to follow the instruction and setup the flow in Klaviyo
3.2 Enable Price Drop Alerts in the Wishlist Plus app
Navigate to the Price Drop card and click on the Setup Alert.
Set threshold and click Turn On.
Note: This is a single-product event
Setting Up Price Drop Flow in Klaviyo
Log into Klaviyo. Go to Flows > Create Flow
Choose “Build Your Own Flow”. Name your flow and click Create
Set Flow Trigger
Choose Metric-Triggered Flow
Select Swym-pricedrop
Add profile and trigger filters if needed
Add Email or SMS blocks
Drag and drop the block
Customize subject line and content
Personalize Product Info by using table or HTML blocks.
Test and Launch
Send test email
Preview template
Set flow status to Live
Watch the detailed setup video to follow the instruction and setup the flow in Klaviyo
3.3 Enable Back in Stock Alerts in the Wishlist Plus App
Navigate to the Back in Stock section
Enable feature via toggle
A product must have at least one unit in stock to trigger
Setting Up Back in Stock Flow in Klaviyo
Log into Klaviyo. Go to Flows > Create Flow
Choose “Build Your Own Flow”. Name your flow and click Create
Set Flow Trigger
Choose Metric-Triggered Flow
Select Swym-backinstock
Add profile and trigger filters if needed
Add Email or SMS blocks
Drag and drop the block
Customize subject line and content
Personalize Product Info by using table or HTML blocks.
Test and Launch
Send test email
Preview template
Set flow status to Live
Watch the detailed setup video to follow the instruction and setup the flow in Klaviyo
3.4 Enable Low Stock Alerts in the Wishlist Plus App
Go to the Low Stock section
Set the stock level threshold
Enable the feature
Setting Up Low Stock Flow in Klaviyo
Log into Klaviyo. Go to Flows > Create Flow
Choose “Build Your Own Flow”. Name your flow and click Create
Set Flow Trigger
Choose Metric-Triggered Flow
Select Swym-lowstock
Add profile and trigger filters if needed
Add Email or SMS blocks
Drag and drop the block
Customize subject line and content
Personalize Product Info by using a table or HTML block.
Test and Launch
Send test email
Preview template
Set flow status to Live
3.5 Enable Save for Later Reminder in the Wishlist Plus App
Enables alerts for items saved from the cart
Helps convert abandoned interest to sales
Setting Up Safe for Later Flow in Klaviyo
Log into Klaviyo. Go to Flows > Create Flow
Choose “Build Your Own Flow”. Name your flow and click Create
Set Flow Trigger
Choose Metric-Triggered Flow
Select Swym-sflReminder
Add profile and trigger filters if needed
Add Email or SMS blocks
Drag and drop the block
Customize subject line and content
Personalize Product Info by using table or HTML blocks.
Test and Launch
Send test email
Preview template
Set flow status to Live
Note: Enabling these features allows data to flow to Klaviyo, but shopper messages only go out when corresponding flows are created and set to live in Klaviyo.
Creating Flows in Klaviyo
This section outlines the step-by-step process for setting up flows in Klaviyo. While the setup has been briefly mentioned under each trigger above, this section brings all the instructions together in one place for easy reference.
To Create Flows in Klaviyo →
Log into Klaviyo. Go to Flows > Create Flow
Choose “Build Your Own Flow”. Name your flow and click Create
Explore proven marketing plays using Wishlist data to drive conversions, improve engagement, and recover revenue: Swym Use Case Library
FAQs
What if a shopper doesn’t provide an email? Events are sent to Klaviyo only for identified users (email or SMS). Anonymous activity isn’t synced.
Can I run SMS-only campaigns? Yes. You can configure Klaviyo to send SMS using these events too.
How do I stop sending events? To pause messages, switch the Klaviyo flow to Draft mode or disable the trigger in Wishlist Plus.
How do I check if events are reaching Klaviyo? In Klaviyo, go to Metrics and search for the event name (e.g., Swym-wishlistReminder). You can also trigger a test event from the Wishlist Plus Integration tab.